Deployment Guide
This guide walks you through the options for running your Lumibot trading strategy outside your local machine. You have two paths:
Option A — BotSpot (recommended): Managed Lumibot cloud. Hosted backtesting data, parallel backtests, broker connections, cheaper scheduled deployment, monitoring, logs, alerts, audit history, and kill switches are already wired together. Best for most users.
Option B — Self-hosted (Render or Replit): Deploy it yourself on a general-purpose cloud host. Full control, you manage everything. Best for developers who want to own the infrastructure.
Pick the option that matches how much infrastructure you want to manage. Both run the exact same Lumibot strategy code.
Option A — Deploy on BotSpot (Recommended)
BotSpot is the managed cloud platform built around Lumibot. It is better than starting from a blank server because the expensive parts are already solved: market data setup, backtesting workers, broker connections, scheduling, logs, alerts, monitoring, audit history, and kill-switch controls.
BotSpot is also better than using a generic coding assistant by itself. Claude, Codex, Cursor, and ChatGPT can write Python, but BotSpot adds the Lumibot-specific layer around the code: tuned strategy prompts, hosted backtests, artifacts, broker setup, deployment, observability, and MCP tools your coding agent can call directly.
Why BotSpot:
Backtesting data included. Use supported hosted data for stocks, futures, options, macro data, filings, and other strategy inputs without wrangling every vendor, API key, downloader, and local file yourself. Some data is included; premium datasets can be much cheaper than buying direct subscriptions.
Cheaper deployment at scale. Scheduled or periodic bots should not need a full always-on cloud server per strategy. BotSpot runs Lumibot bots on infrastructure built for this workload, so running many strategies can be dramatically cheaper than maintaining your own servers.
Lumibot-tuned AI. BotSpot’s AI workflows are built for Lumibot strategy structure, broker setup, backtests, artifacts, and deployment. That produces a stronger workflow than asking a generic coding assistant to write a file and leaving the rest to you.
MCP for your coding agents. Connect BotSpot to Codex, Claude Code, Cursor, and other MCP clients so your assistant can run backtests, inspect artifacts, compare results, and prepare deployment instead of only generating code.
Work from anywhere. Start in the web app, continue from your phone, Telegram, Discord, Claude, ChatGPT, or another connected client, and keep the same strategies, backtests, logs, and broker context in one place.
Marketplace and strategy library. Browse existing strategies, clone or adapt code when the author allows it, run marketplace strategies yourself, and publish your own strategies for others to use.
Broker connections built in. Connect supported brokers through the website instead of hand-wiring secrets, environment variables, and account checks on every server you run.
Observability and control. Inspect why a strategy acted, review charts, trades, logs, artifacts, audit trails, alerts, account checks, and kill switches without building that stack yourself.
Browse the BotSpot marketplace, or connect the BotSpot MCP server.
Tip
Already have a Lumibot strategy you wrote locally? You can bring your own code into BotSpot through the strategy editor. You can also use BotSpot’s AI agent to adapt existing strategies.
Option B — Self-hosted Deployment (Render or Replit)
If you want full control of your infrastructure, you can deploy Lumibot yourself on any cloud host that runs Python. This guide covers the two platforms we have tested end-to-end: Render and Replit.
Note
Self-hosting means you manage the server, scheduler, environment variables, broker credentials, logs, alerts, and uptime. If any of that sounds like more work than you want to take on, use Option A — BotSpot instead.
Example Strategy for Deployment
Important
Important: This example strategy is for those without a strategy ready to deploy. If you have your own strategy, skip to Choosing Your Self-hosted Platform.
Use this example to see the self-hosted deployment process in action. It’s not intended for real-money use. More details are available in the GitHub repository: Example Algorithm GitHub
To run the example strategy yourself, click the Deploy to Render button or the Run on Repl.it button below. If you would rather skip the infrastructure setup entirely, try deploying a sample strategy on BotSpot instead.

Tip
Tip: Scroll down to the Secrets Configuration section for detailed information on setting up your environment variables.
Choosing Your Self-hosted Platform
If you have decided to self-host, pick between Render and Replit:
Render costs about $7/month. It is easier to use and more affordable, and is our recommendation for self-hosted deployment.
Replit costs about $25/month. It is more expensive but is a great choice if you want to edit your code directly in the browser.
Note
Neither Render nor Replit are affiliated with Lumibot or BotSpot. Prices and features may change; check their websites for current pricing.
Deploying to Render
Render offers powerful deployment options with easy scalability. Follow these steps to deploy your application on Render:
Click the “Deploy to Render” Button
Start by clicking the “Deploy to Render” button on the GitHub repository.

Figure 1: Deploy to Render button on GitHub.
Configure the Blueprint
Choose a Blueprint Name: Enter a name for your blueprint, e.g., “Blueprint Name”.
Deploy Blueprint: Click the “Deploy Blueprint” button.
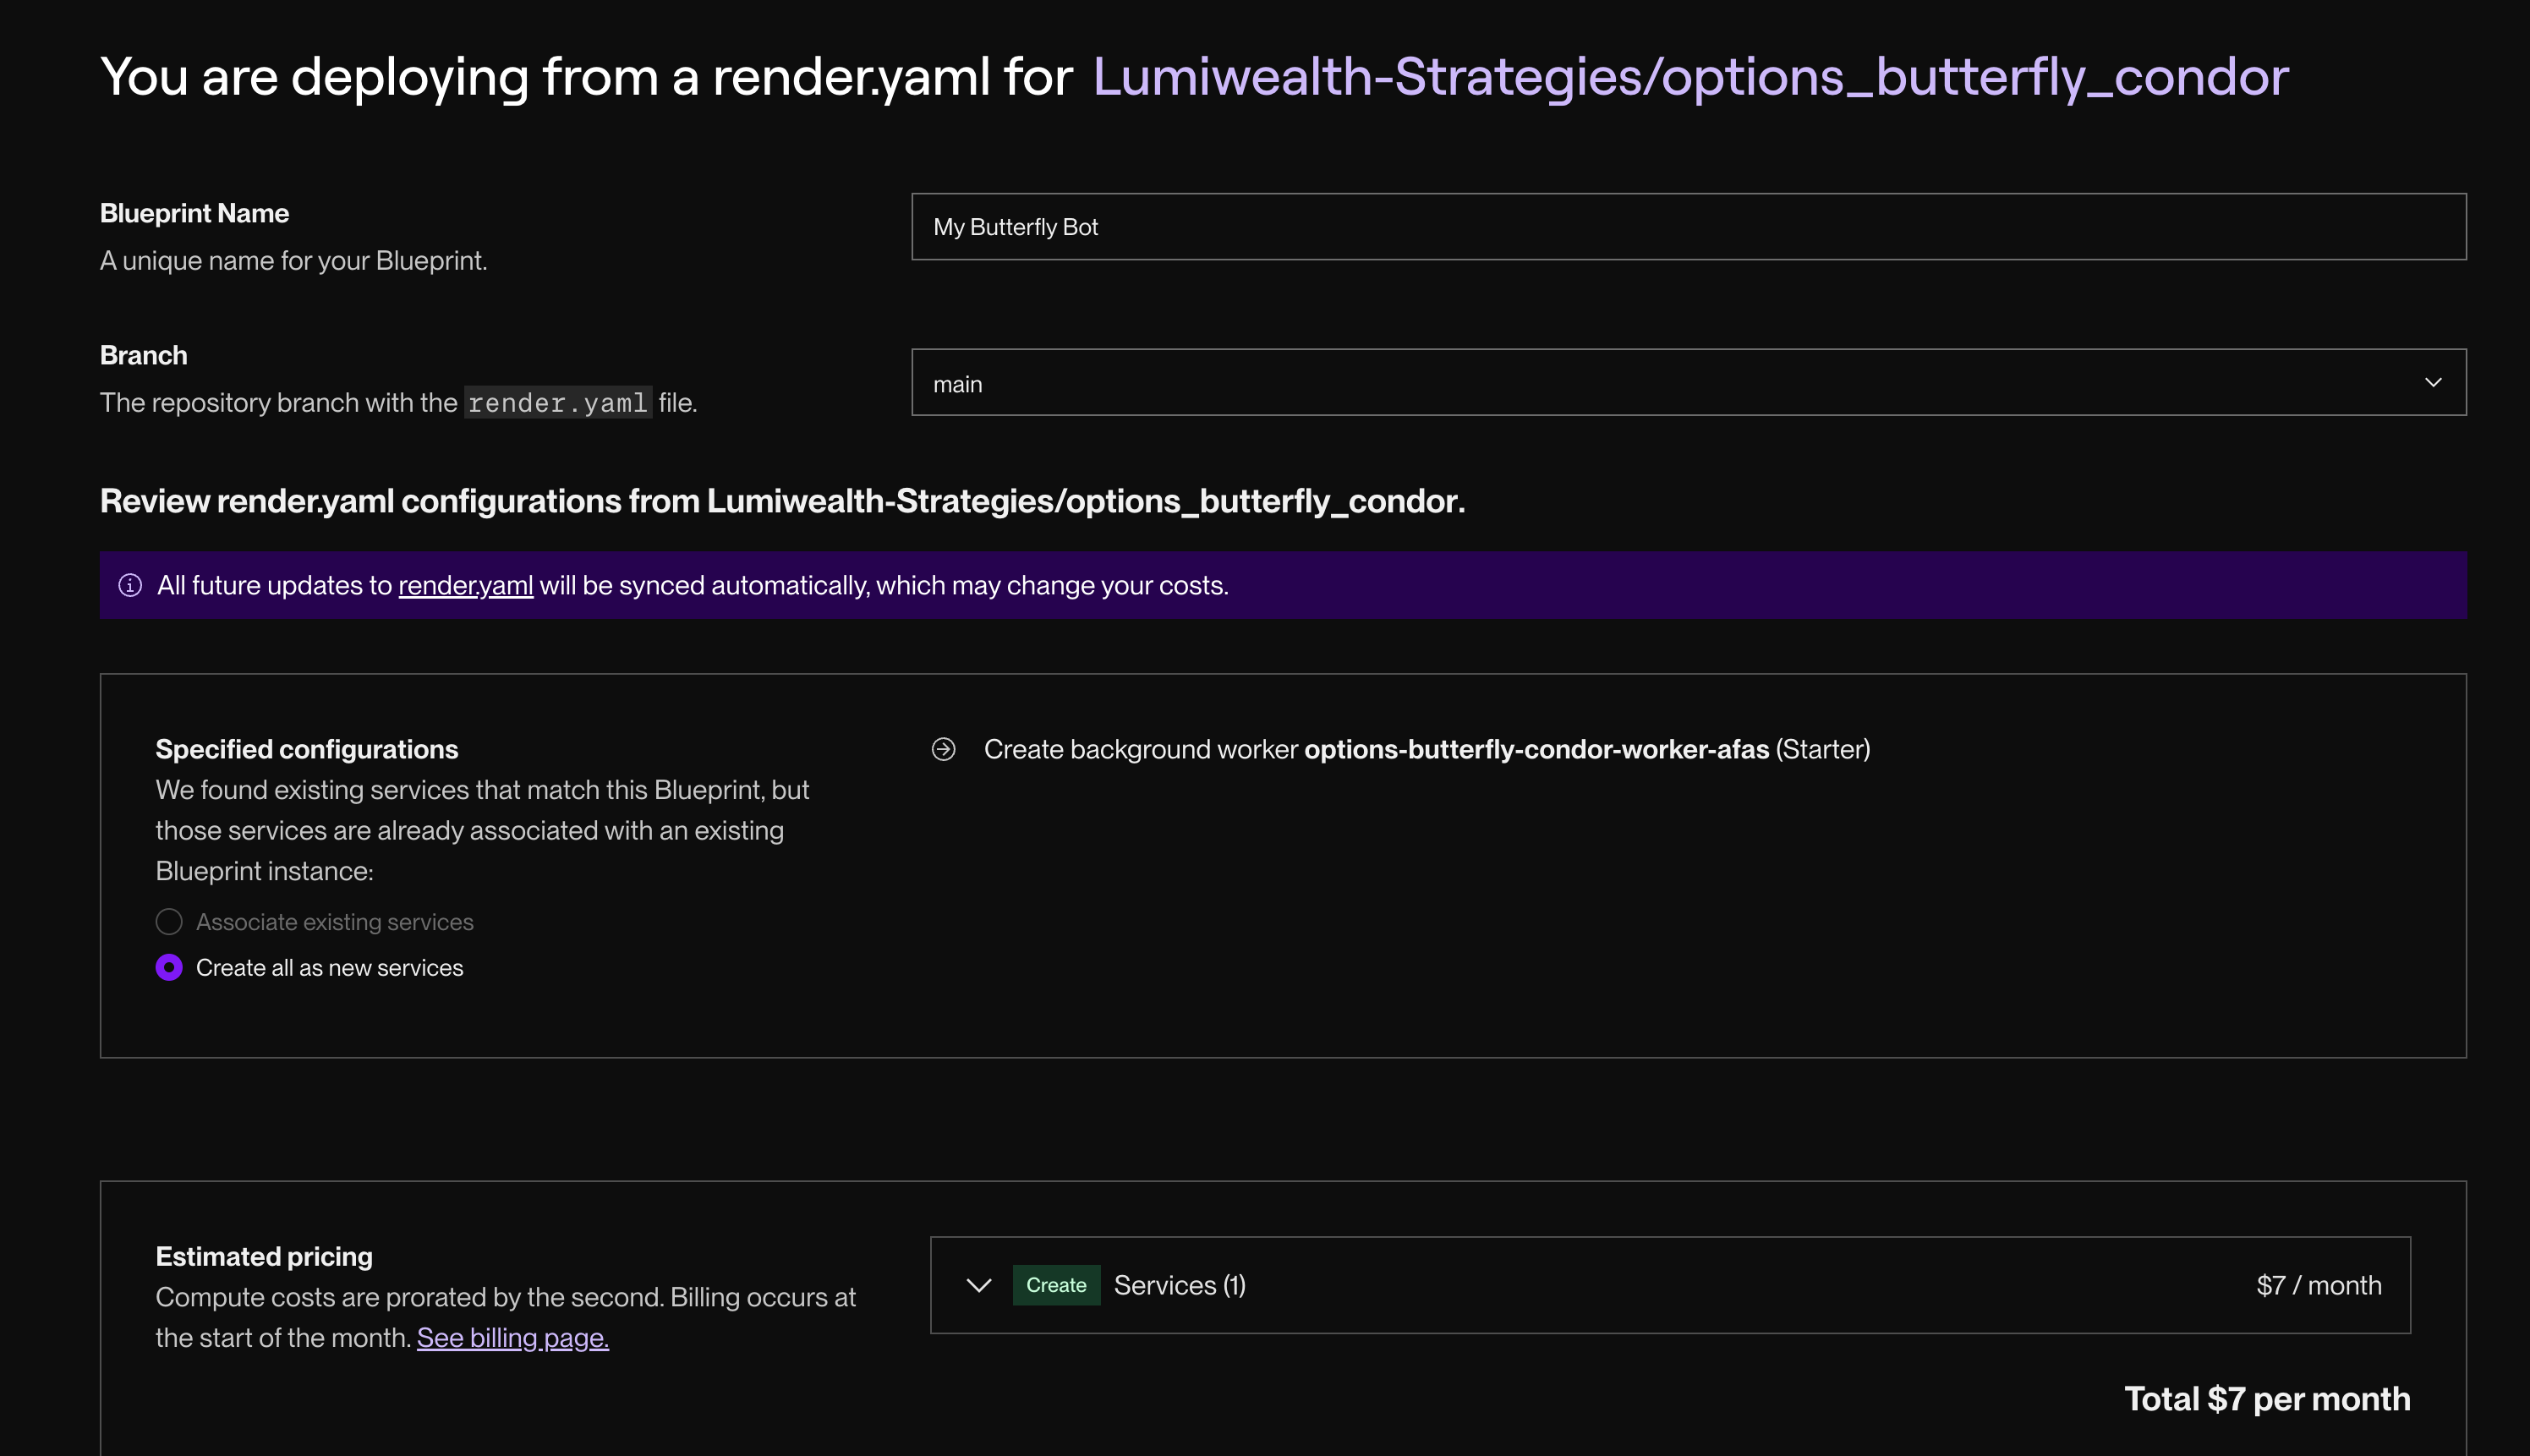
Figure 2: Deploying Blueprint on Render.
Navigate to the Worker
Navigate to the Background Worker: Click on the name of the background worker, e.g., options-butterfly-condor-worker-afas (Starter) so you can configure this specific bot worker (we are currently in the blueprint configuration, not the bot itself).

Figure 3: Worker on Render.
Configure Environment Variables
Select Environment: On the worker’s page, select Environment from the left sidebar.
Edit Environment Variables: Click Edit and fill in the required keys as detailed in the Secrets Configuration section. Once you have added your values for the environment variables, click Save.
Delete Unnecessary Variables: If you have any unnecessary environment variables, you can delete them by clicking the Delete (trashcan) button next to the variable. One example of an unnecessary variable is POLYGON_API_KEY which is only used if you are backtesting.
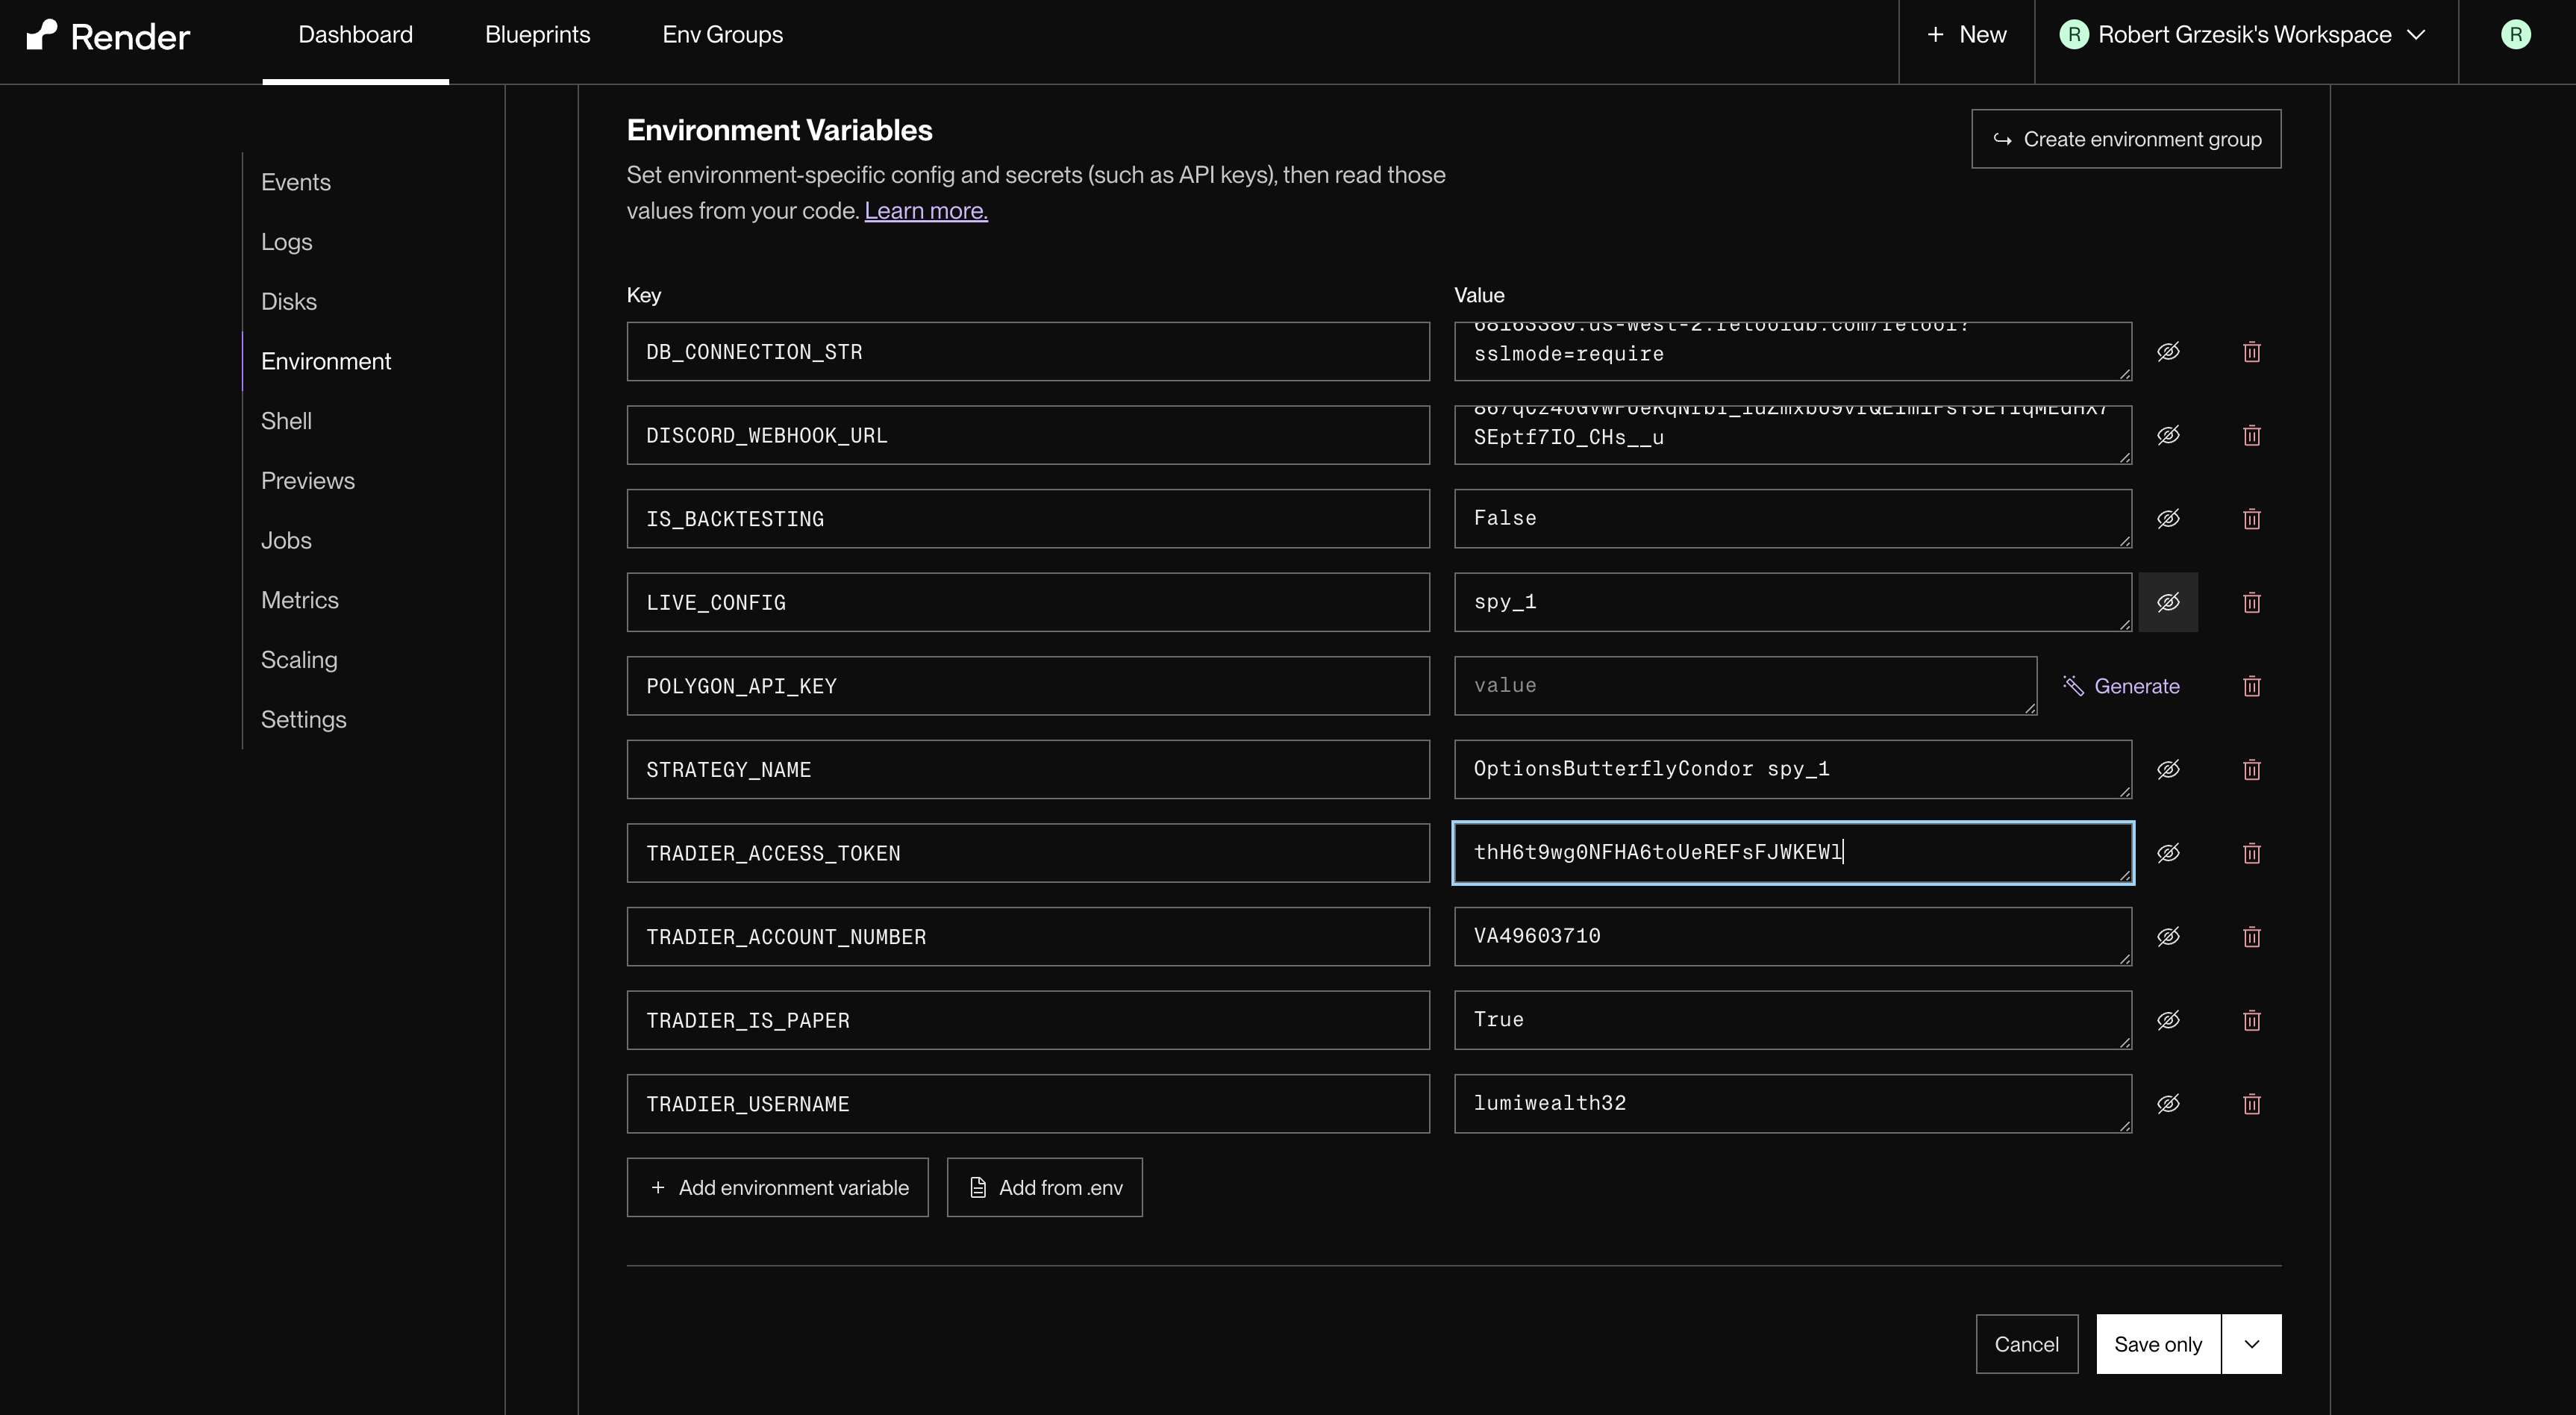
Figure 4: Editing Environment Variables on Render.
Note
Note: Only the environment variables required for your chosen broker are mandatory. Refer to the Secrets Configuration section to see which ones are mandatory and which are optional. If an optional environment variable is not needed, you can delete it.
Restart the Service
After configuring the environment variables, navigate to the top right corner and click “Manual Deploy”, then “Deploy latest commit” to apply the changes.
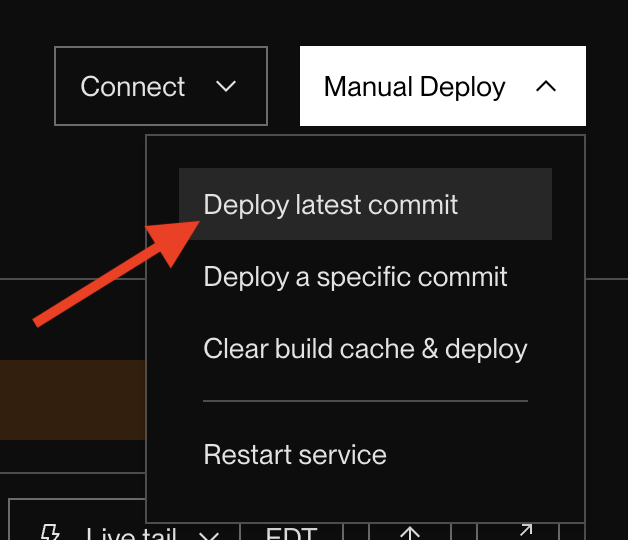
Figure 5: Redeploying the Service on Render using the latest commit.
View The Logs
Check the Logs: Navigate to the Logs tab on the left to view the deployment logs and ensure that there are no errors.
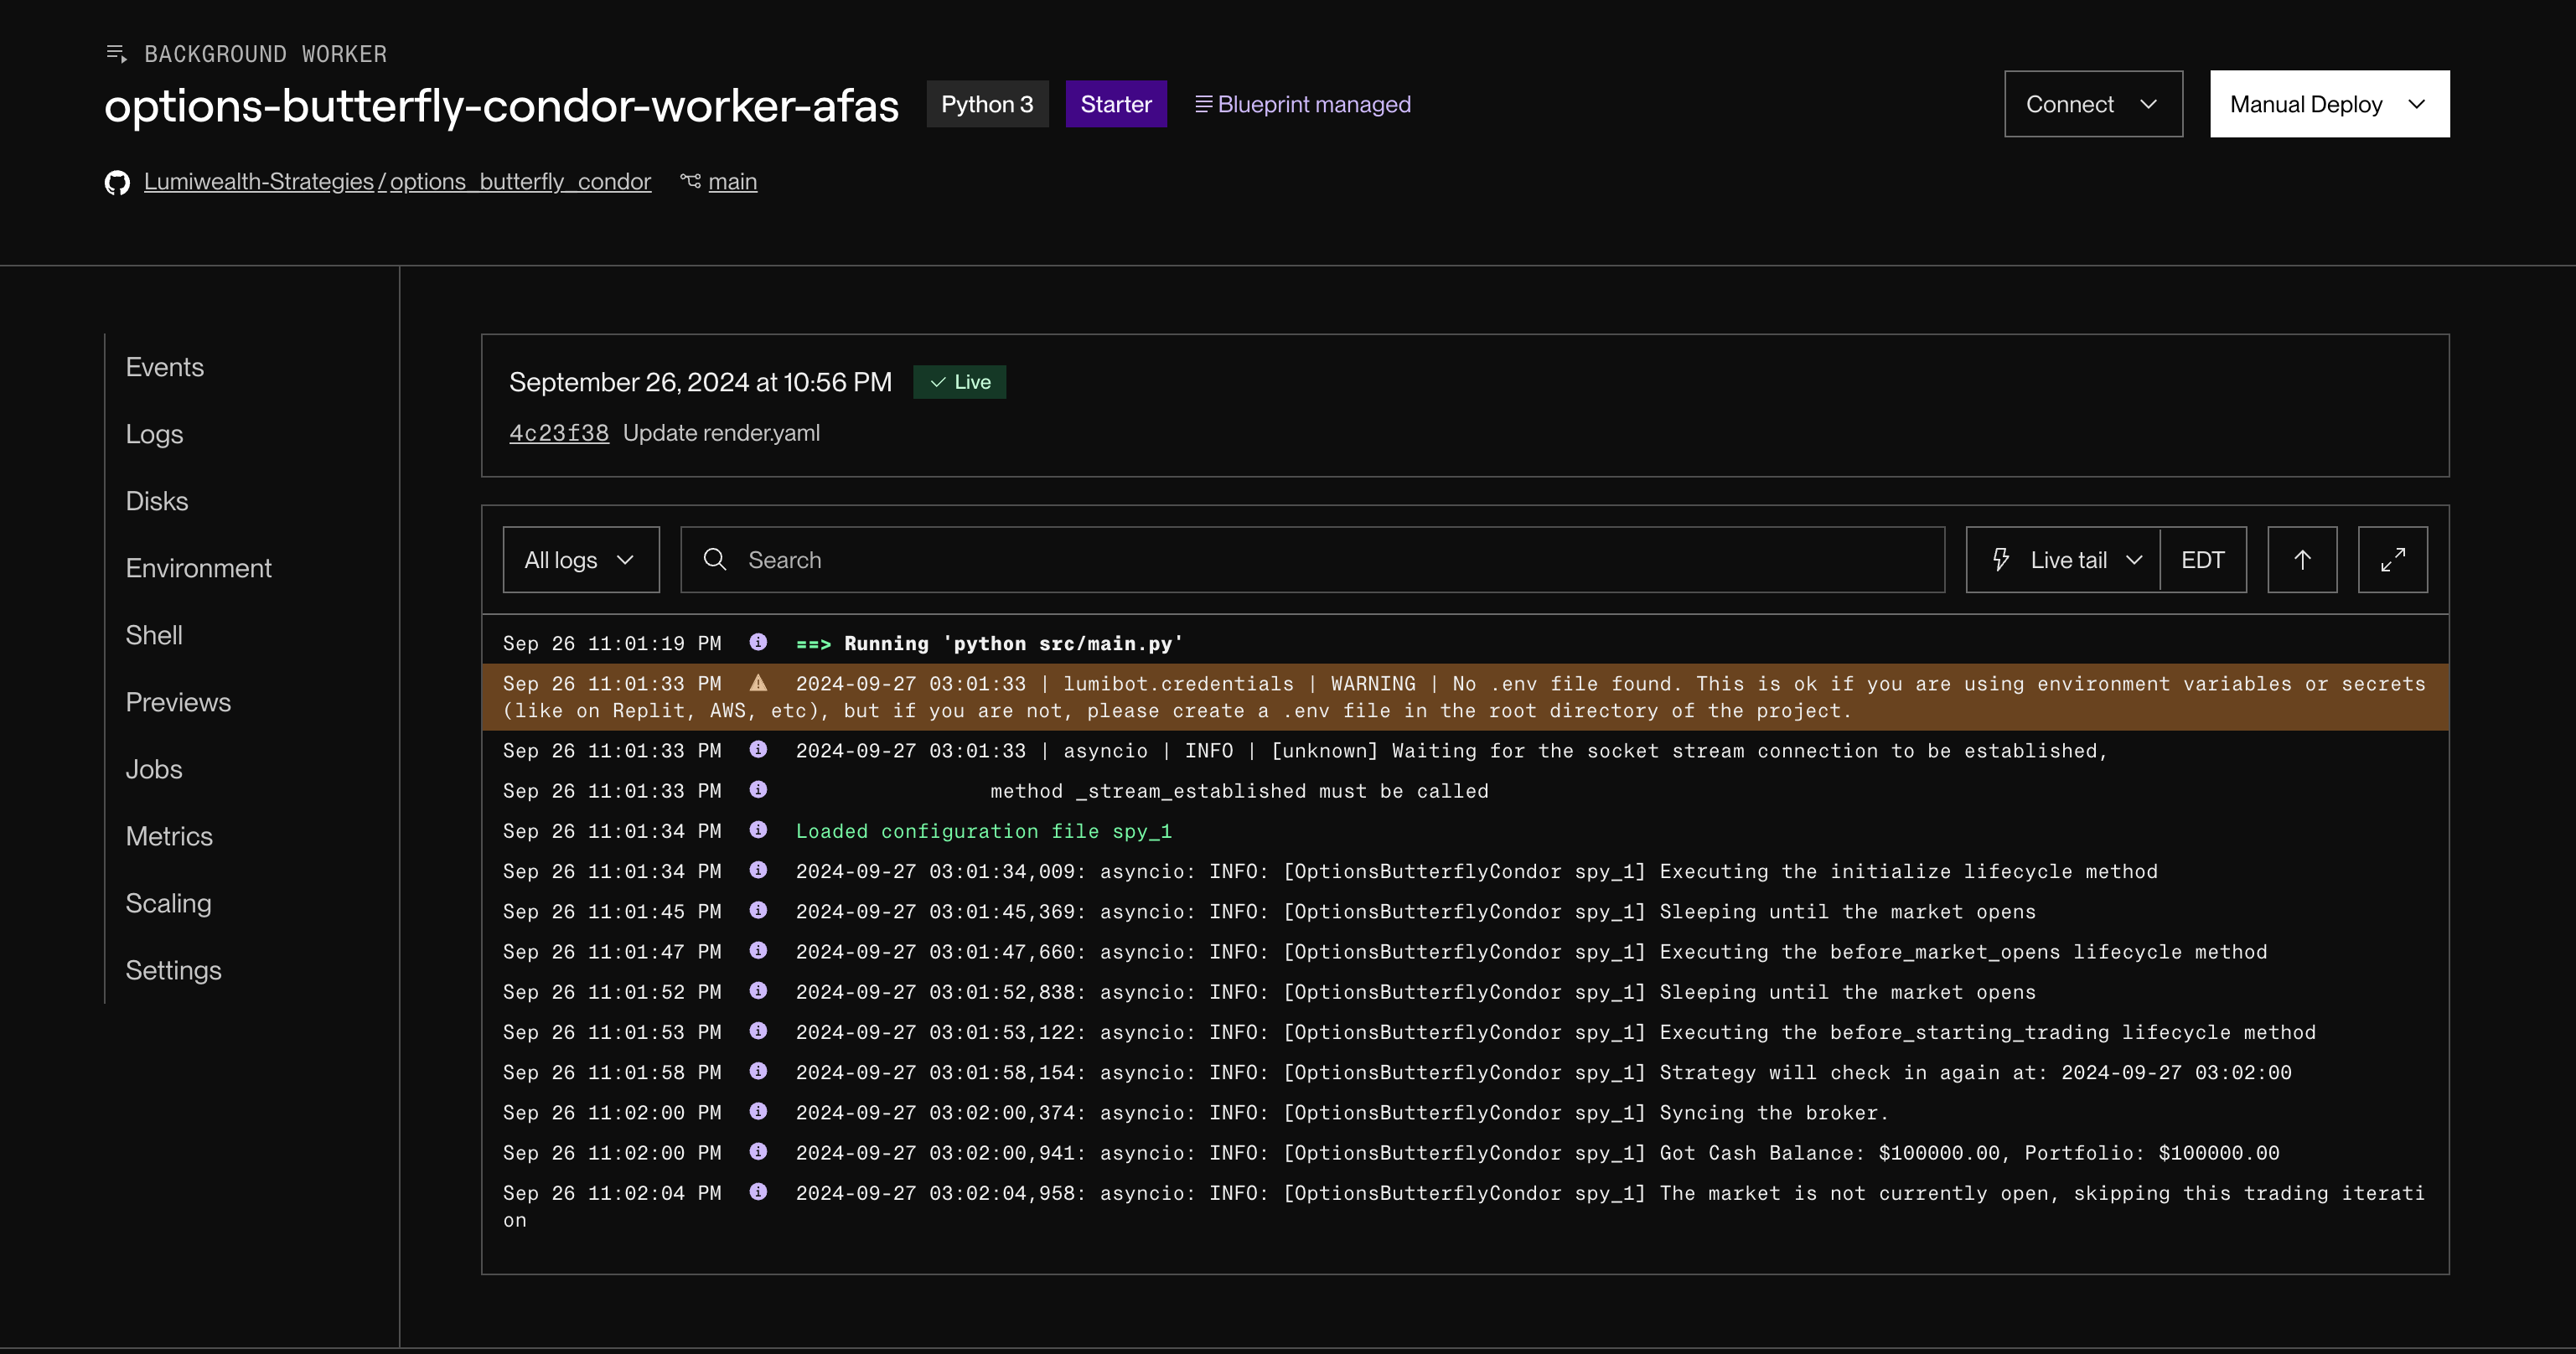
Figure 6: Viewing Logs on Render.
Monitor Bot Performance
Monitor Performance: Go to your broker account to monitor the bot’s performance and ensure that it is executing trades as expected.
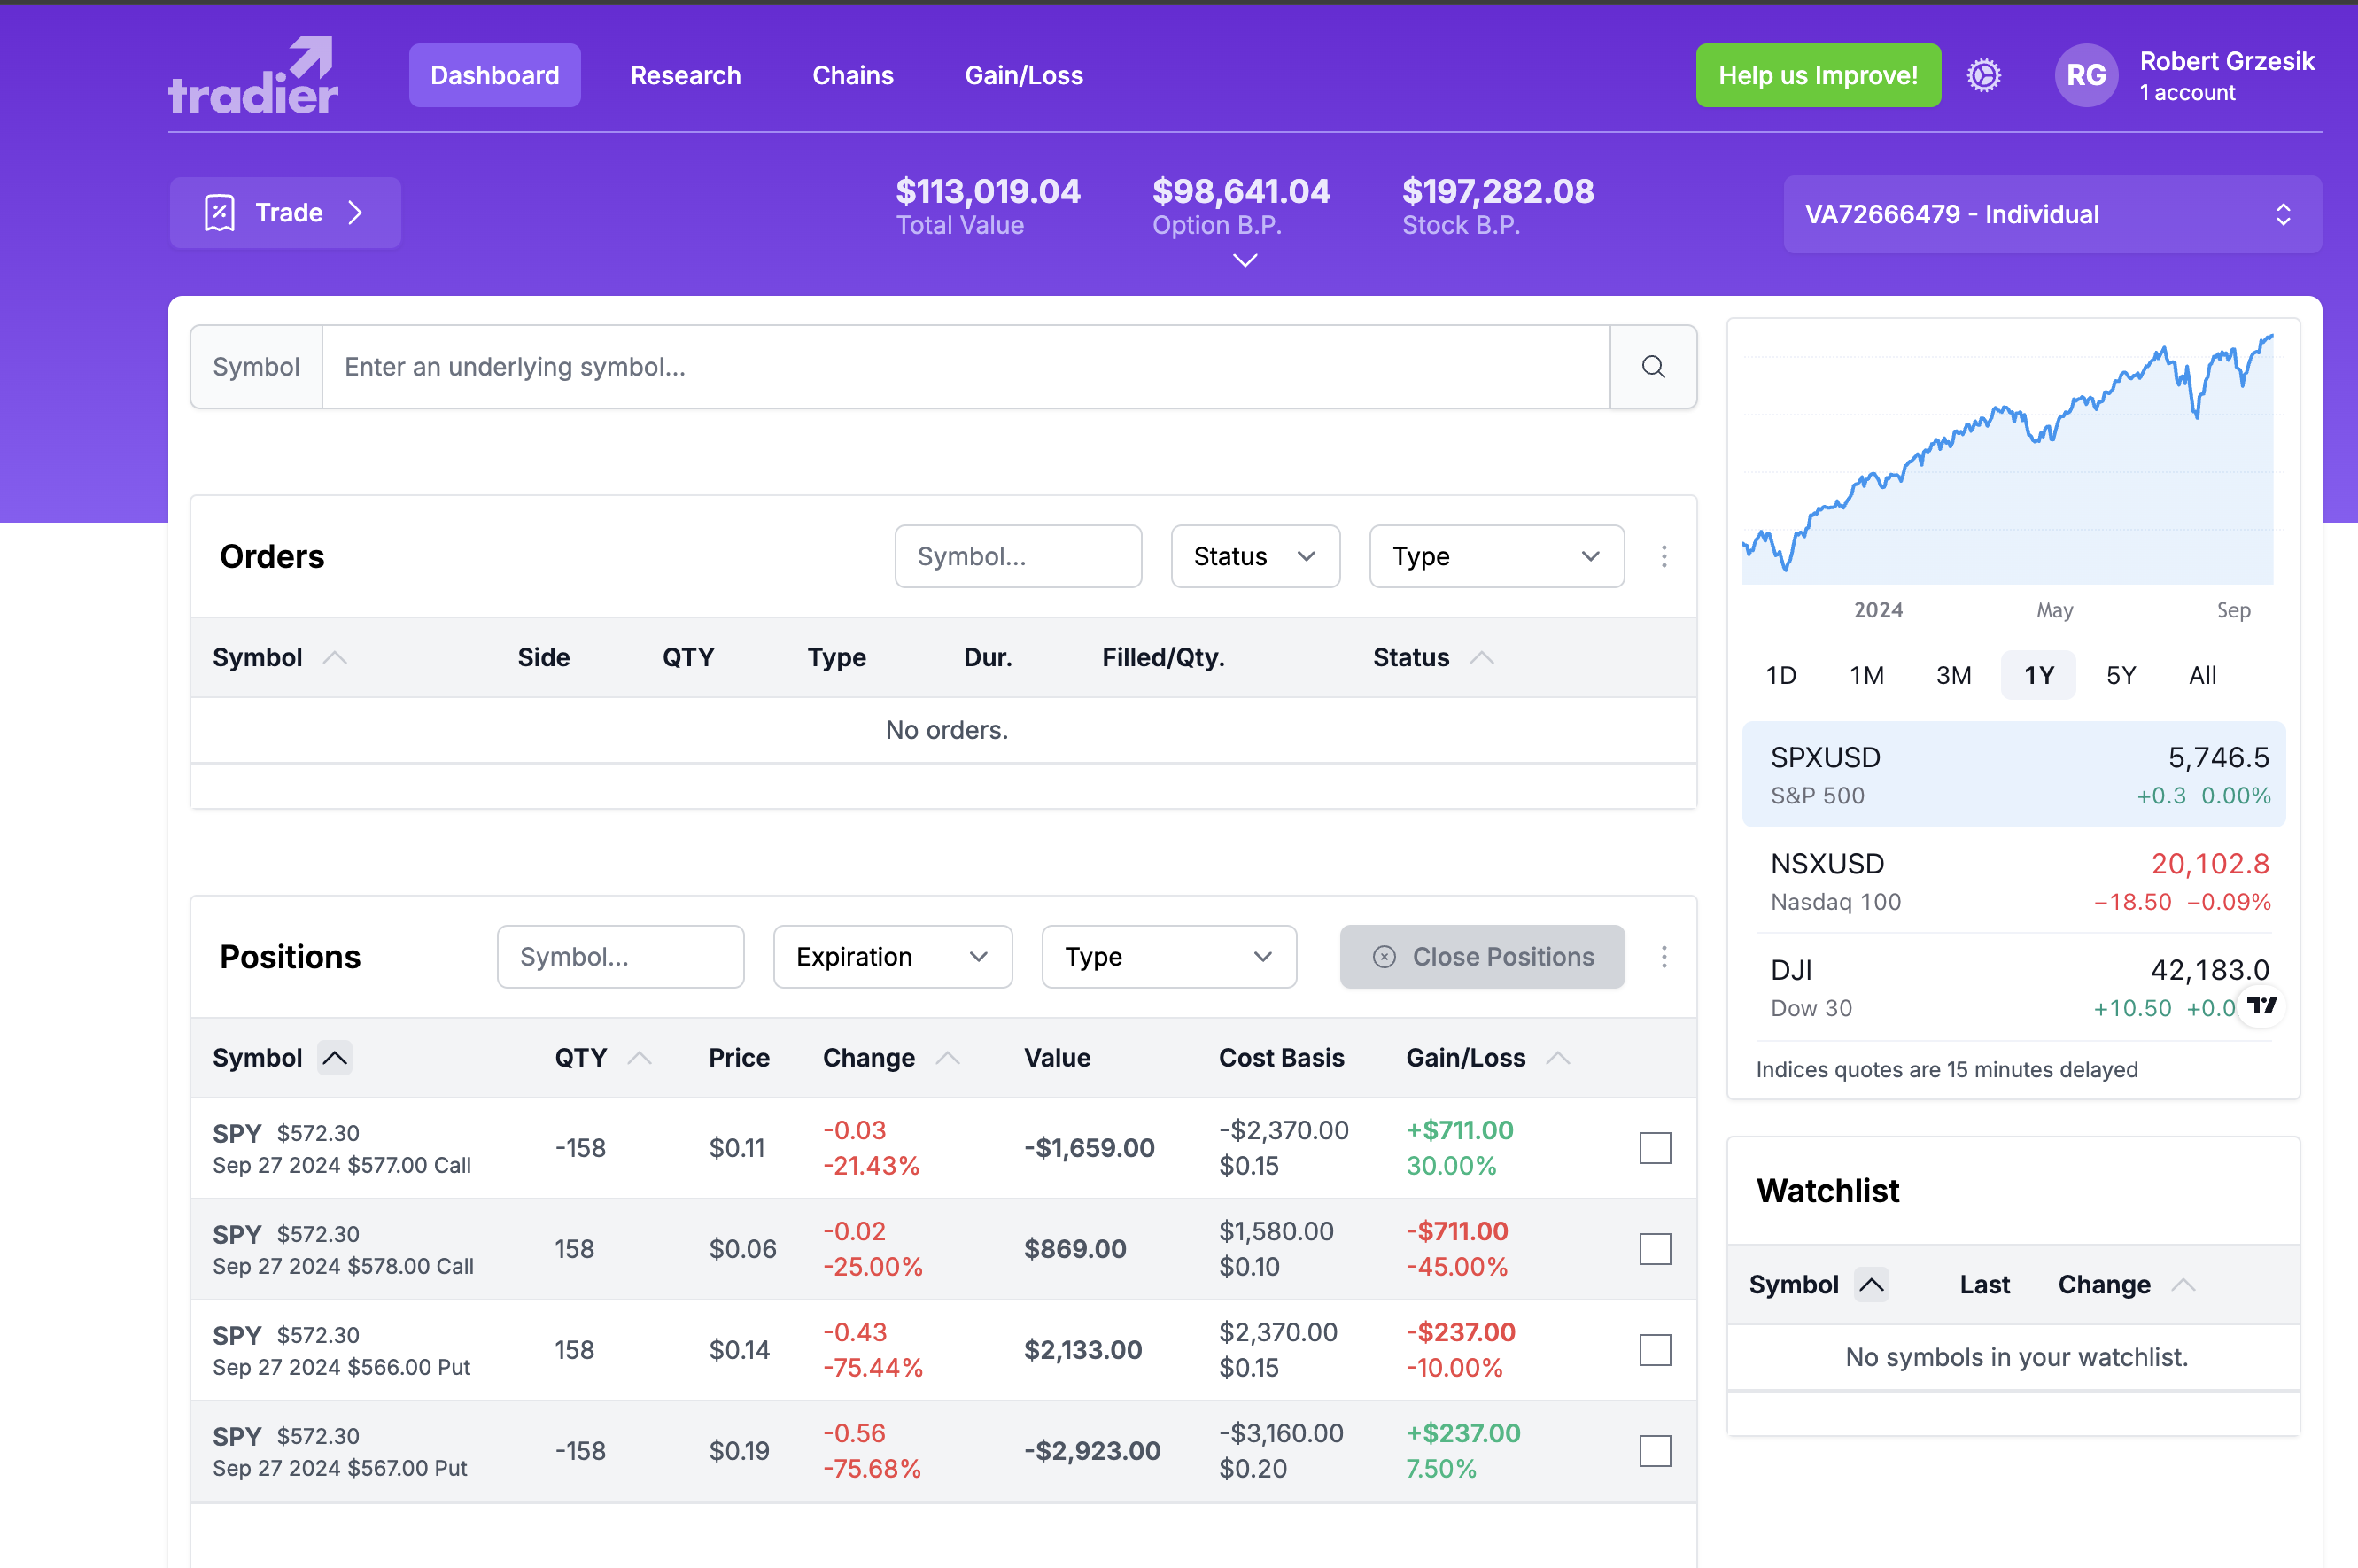
Figure 7: Monitoring bot performance.
Note
Note: Monitor the bot’s performance regularly to ensure that it is functioning correctly and making profitable trades.
Deploying to Replit
Replit is a versatile platform that allows you to deploy applications quickly. Follow these steps to deploy your application on Replit:
Click the “Deploy on Replit” Button
Start by clicking the “Deploy on Replit” button on the GitHub repository.

Figure 8: Deploy on Replit button on GitHub.
Open Secrets Configuration
Once your Replit project is created, navigate to the secrets configuration:
Go to Tools in the sidebar.
Select Secrets at the bottom left corner.
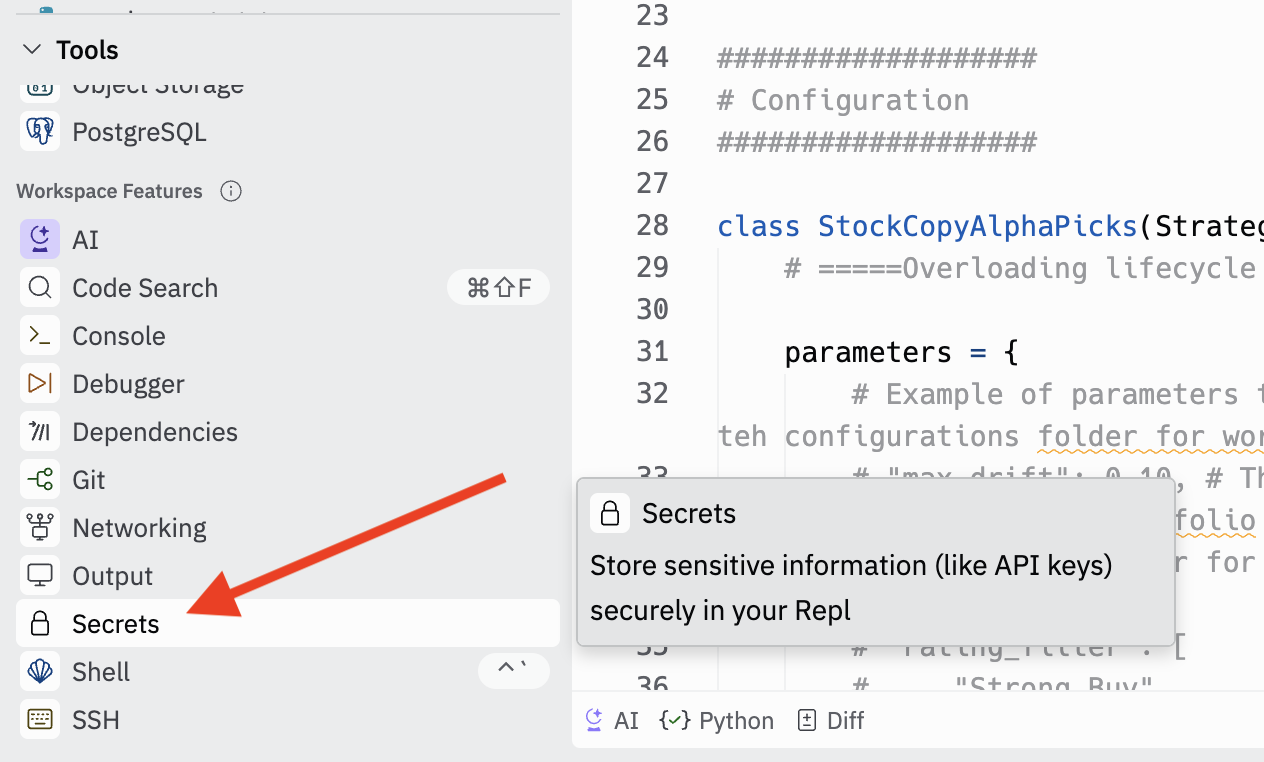
Figure 9: Accessing Secrets in Replit.
Add Required Secrets
In the Secrets tab, add the necessary environment variables as detailed in the Secrets Configuration section.
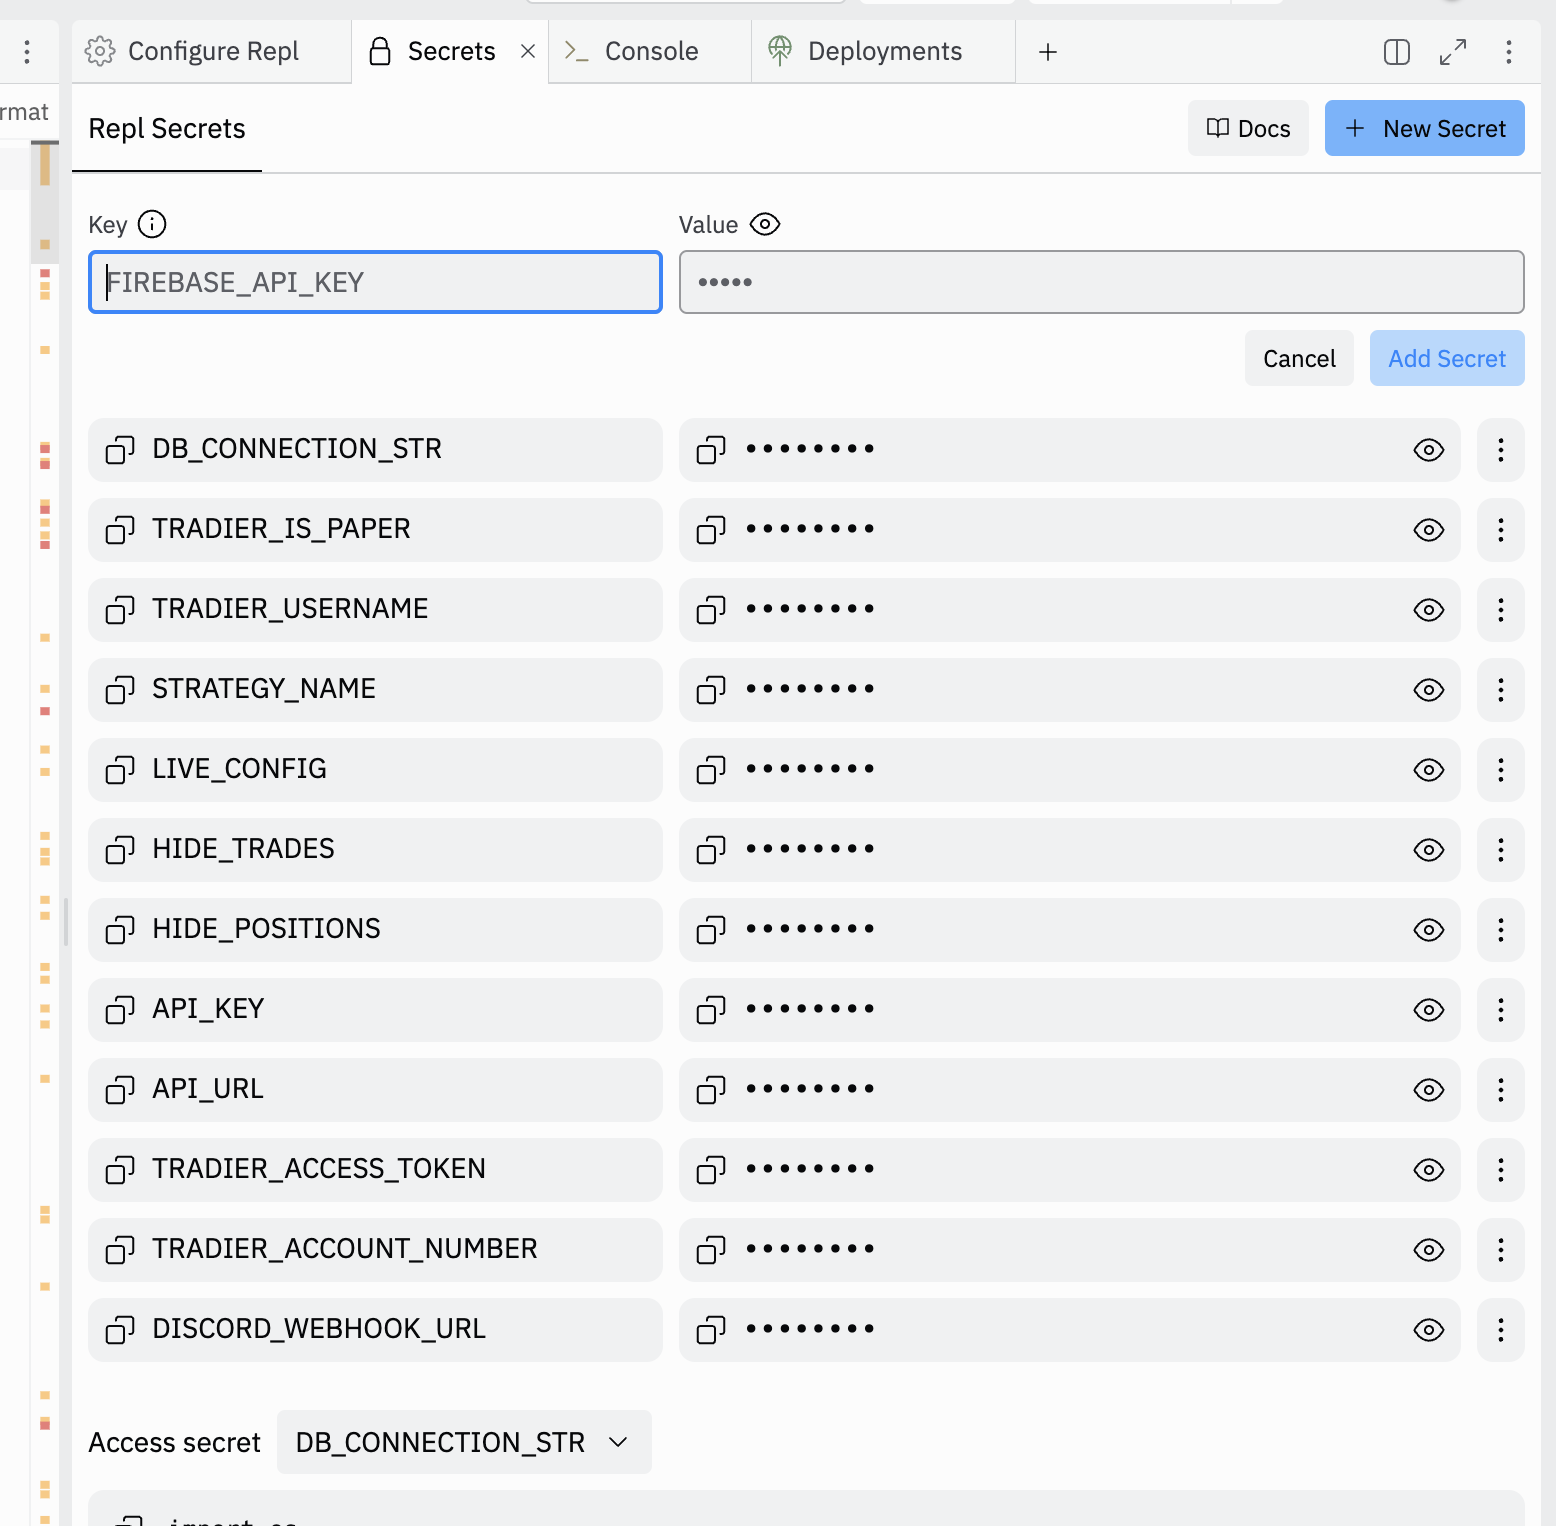
Figure 10: Adding a new secret in Replit.
Test Run the Application
After adding all required secrets, click Run. This step is crucial as it installs all necessary libraries and ensures that the secrets are correctly configured.
When you press Run, the application will start running in the console. You can see the logs in real-time to ensure that everything is working as expected.
Figure 11: Running the application in Replit.
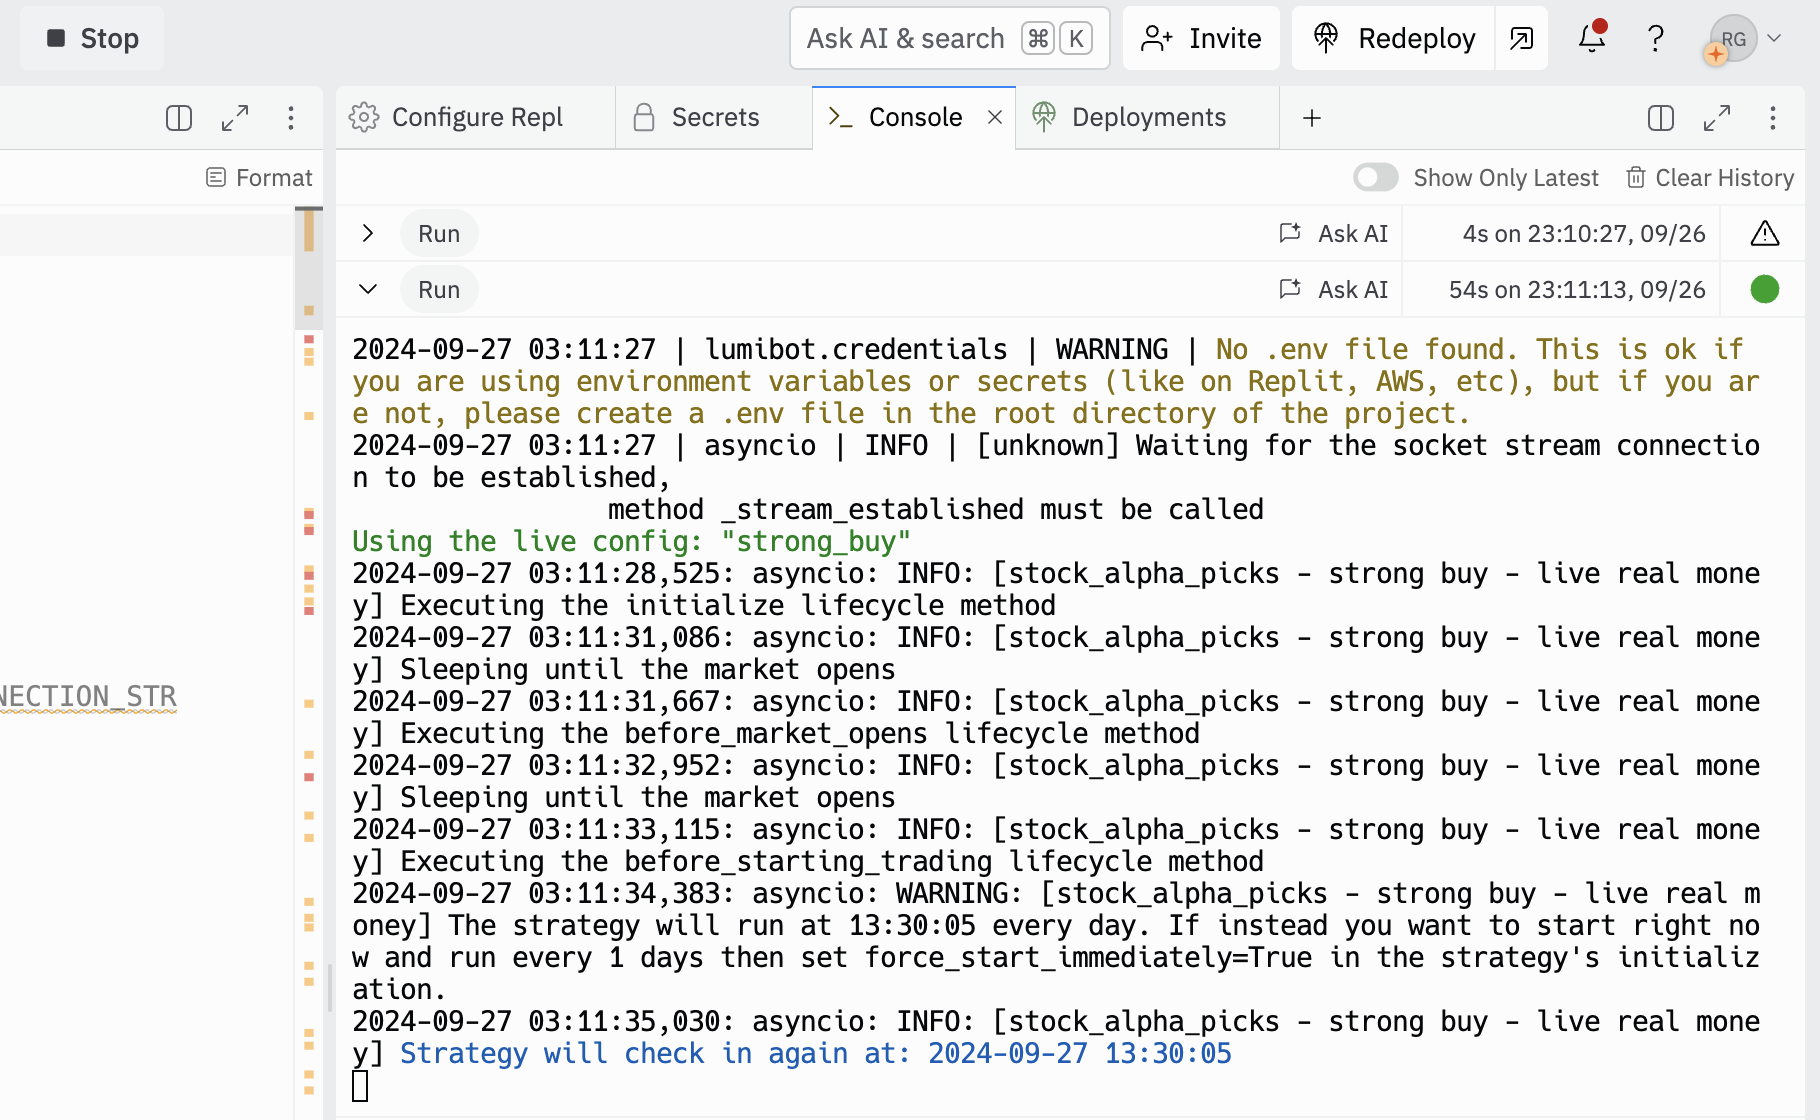
Figure 12: Viewing logs in Replit.
Deployment Part 1
Click Deploy: Navigate to Deploy located under Tools in the top right or within the Background Workers section.
Select Reserved VM: The strategies will only work on a Reserved VM, none of the other options will work.
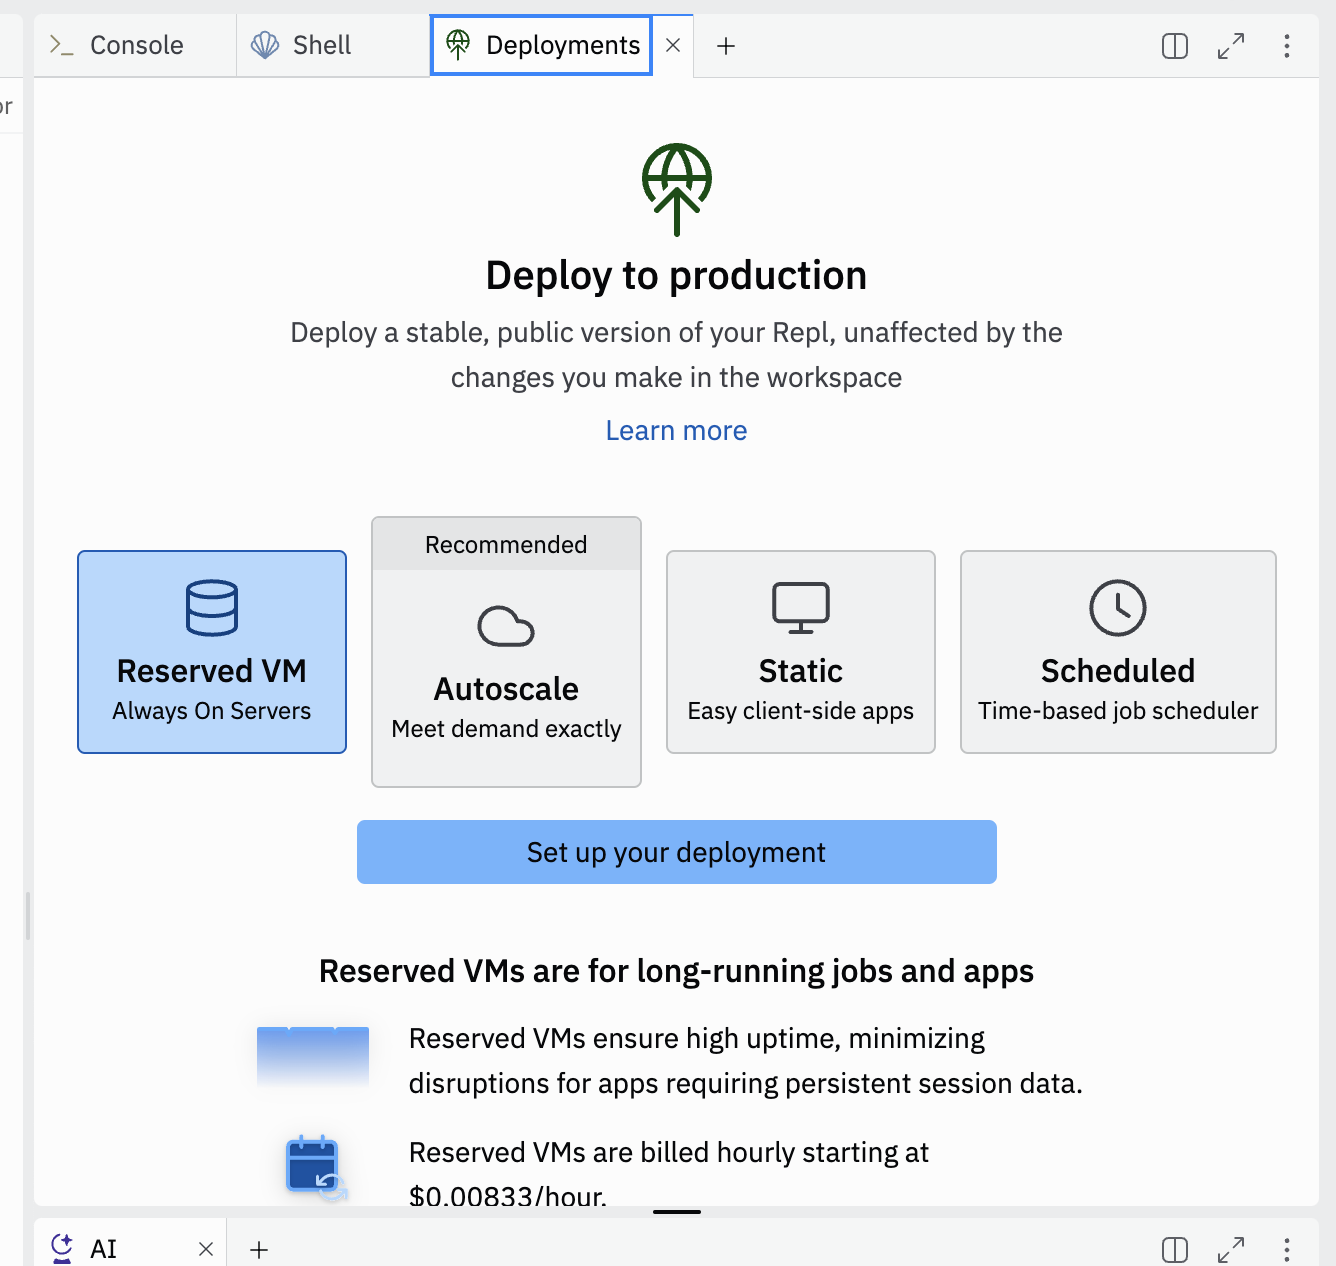
Figure 13: Selecting Reserved VM and Background Worker on Replit.
Note
Note: Ensure that you have downgraded the vCPU before selecting the Background Worker to optimize costs effectively.
Deployment Part 2
Downgrade vCPU: We recommend downgrading to 0.25 vCPU to reduce costs. As of today, it costs $6/month compared to the default $12/month for 0.5 vCPU.
Select Background Worker: Choose “Background Worker”.
Click Deploy: Click “Deploy” to deploy your application.
Wait for Deployment: The deployment process may take a few minutes. Once completed, you will see a success message.
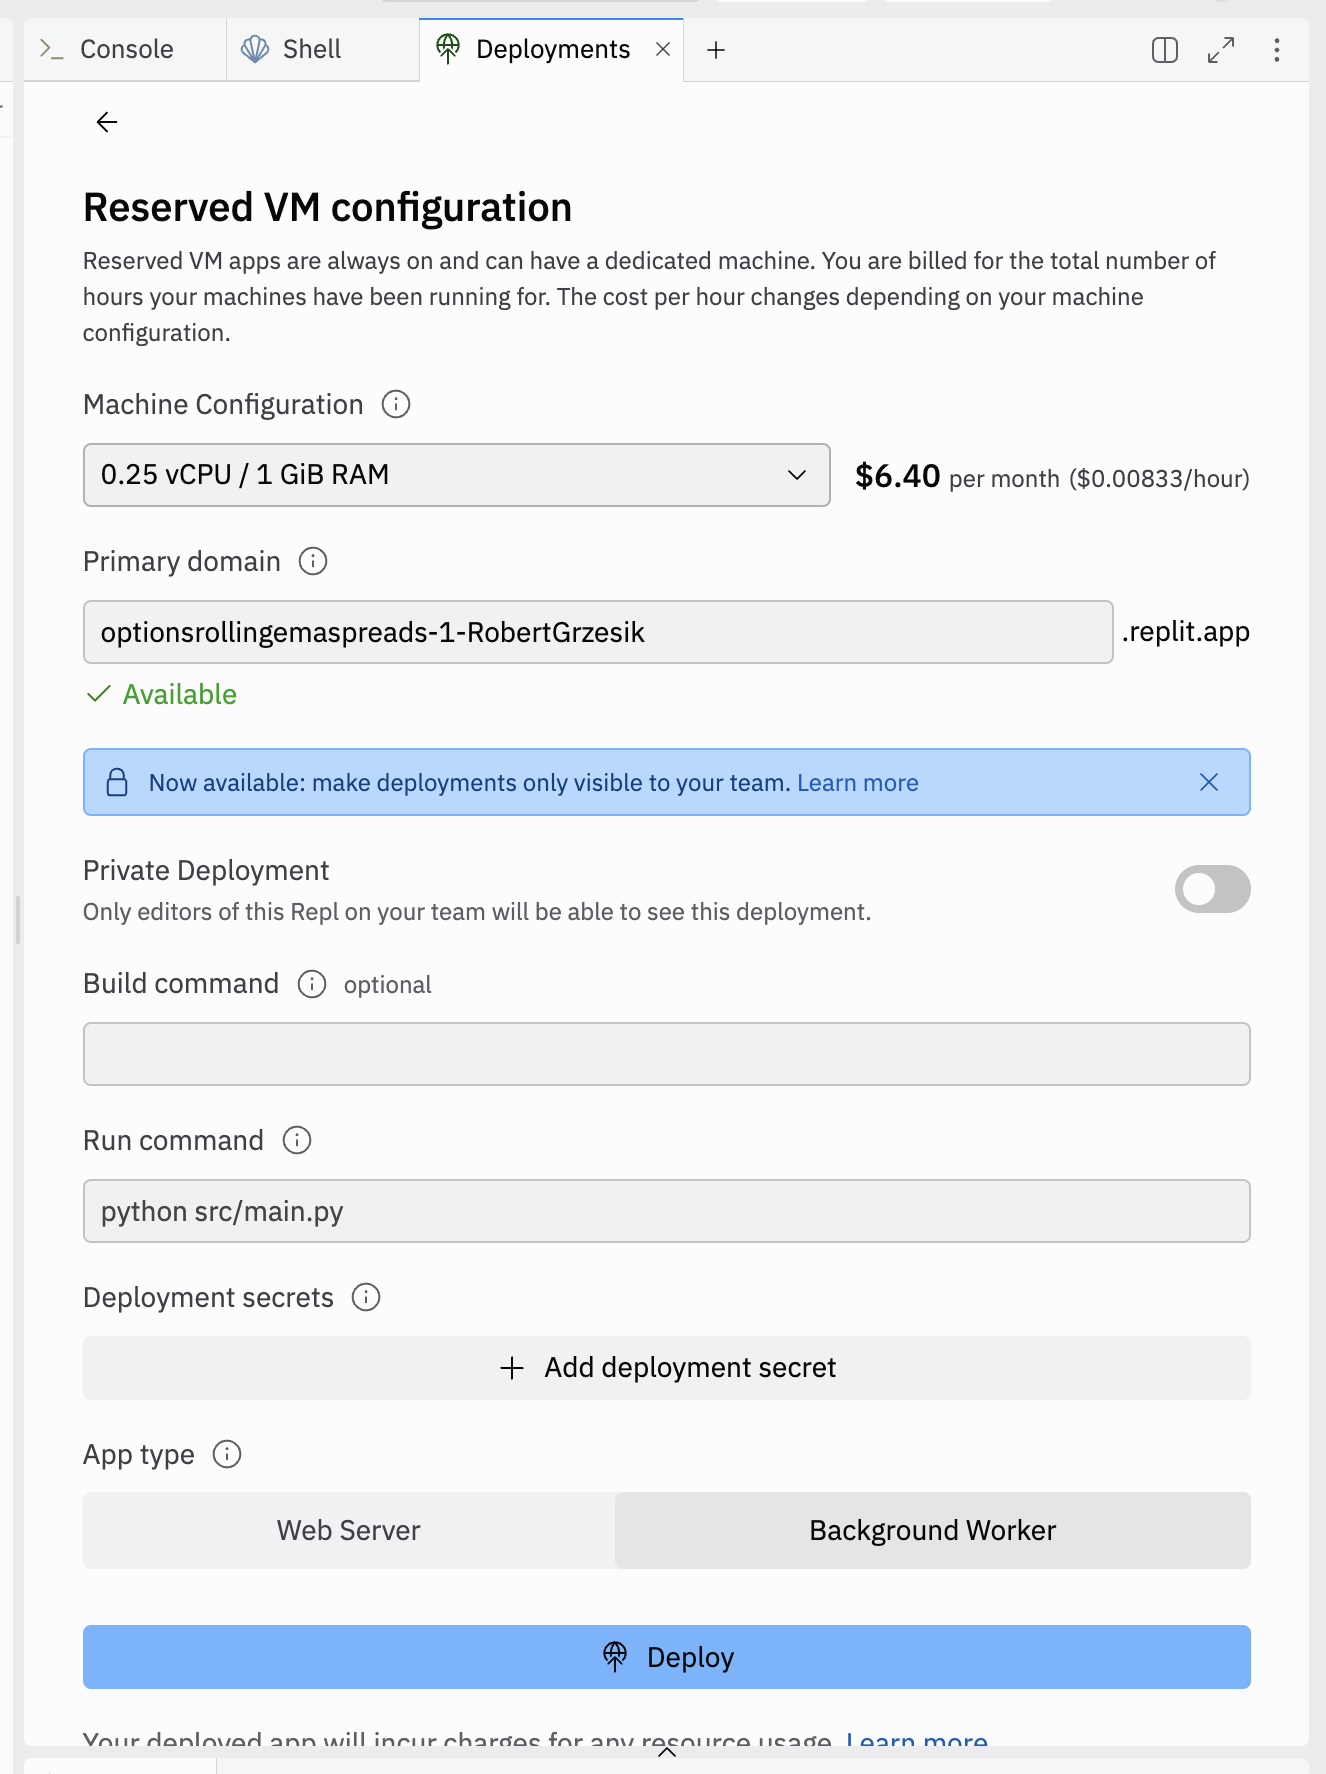
Figure 14: Deploying the application in Replit.
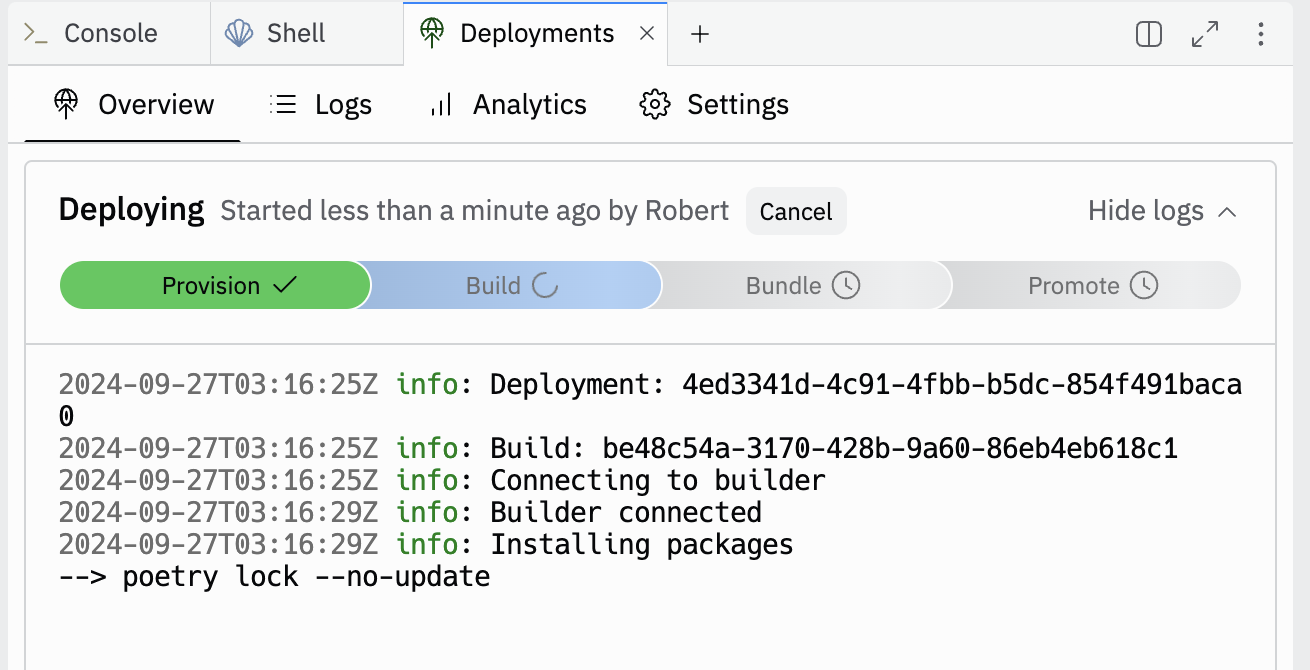
Figure 15: Deployment process in Replit.
Check The Logs
View Logs: Navigate to the Logs tab in Deployment to view the deployment logs and ensure that there are no errors.
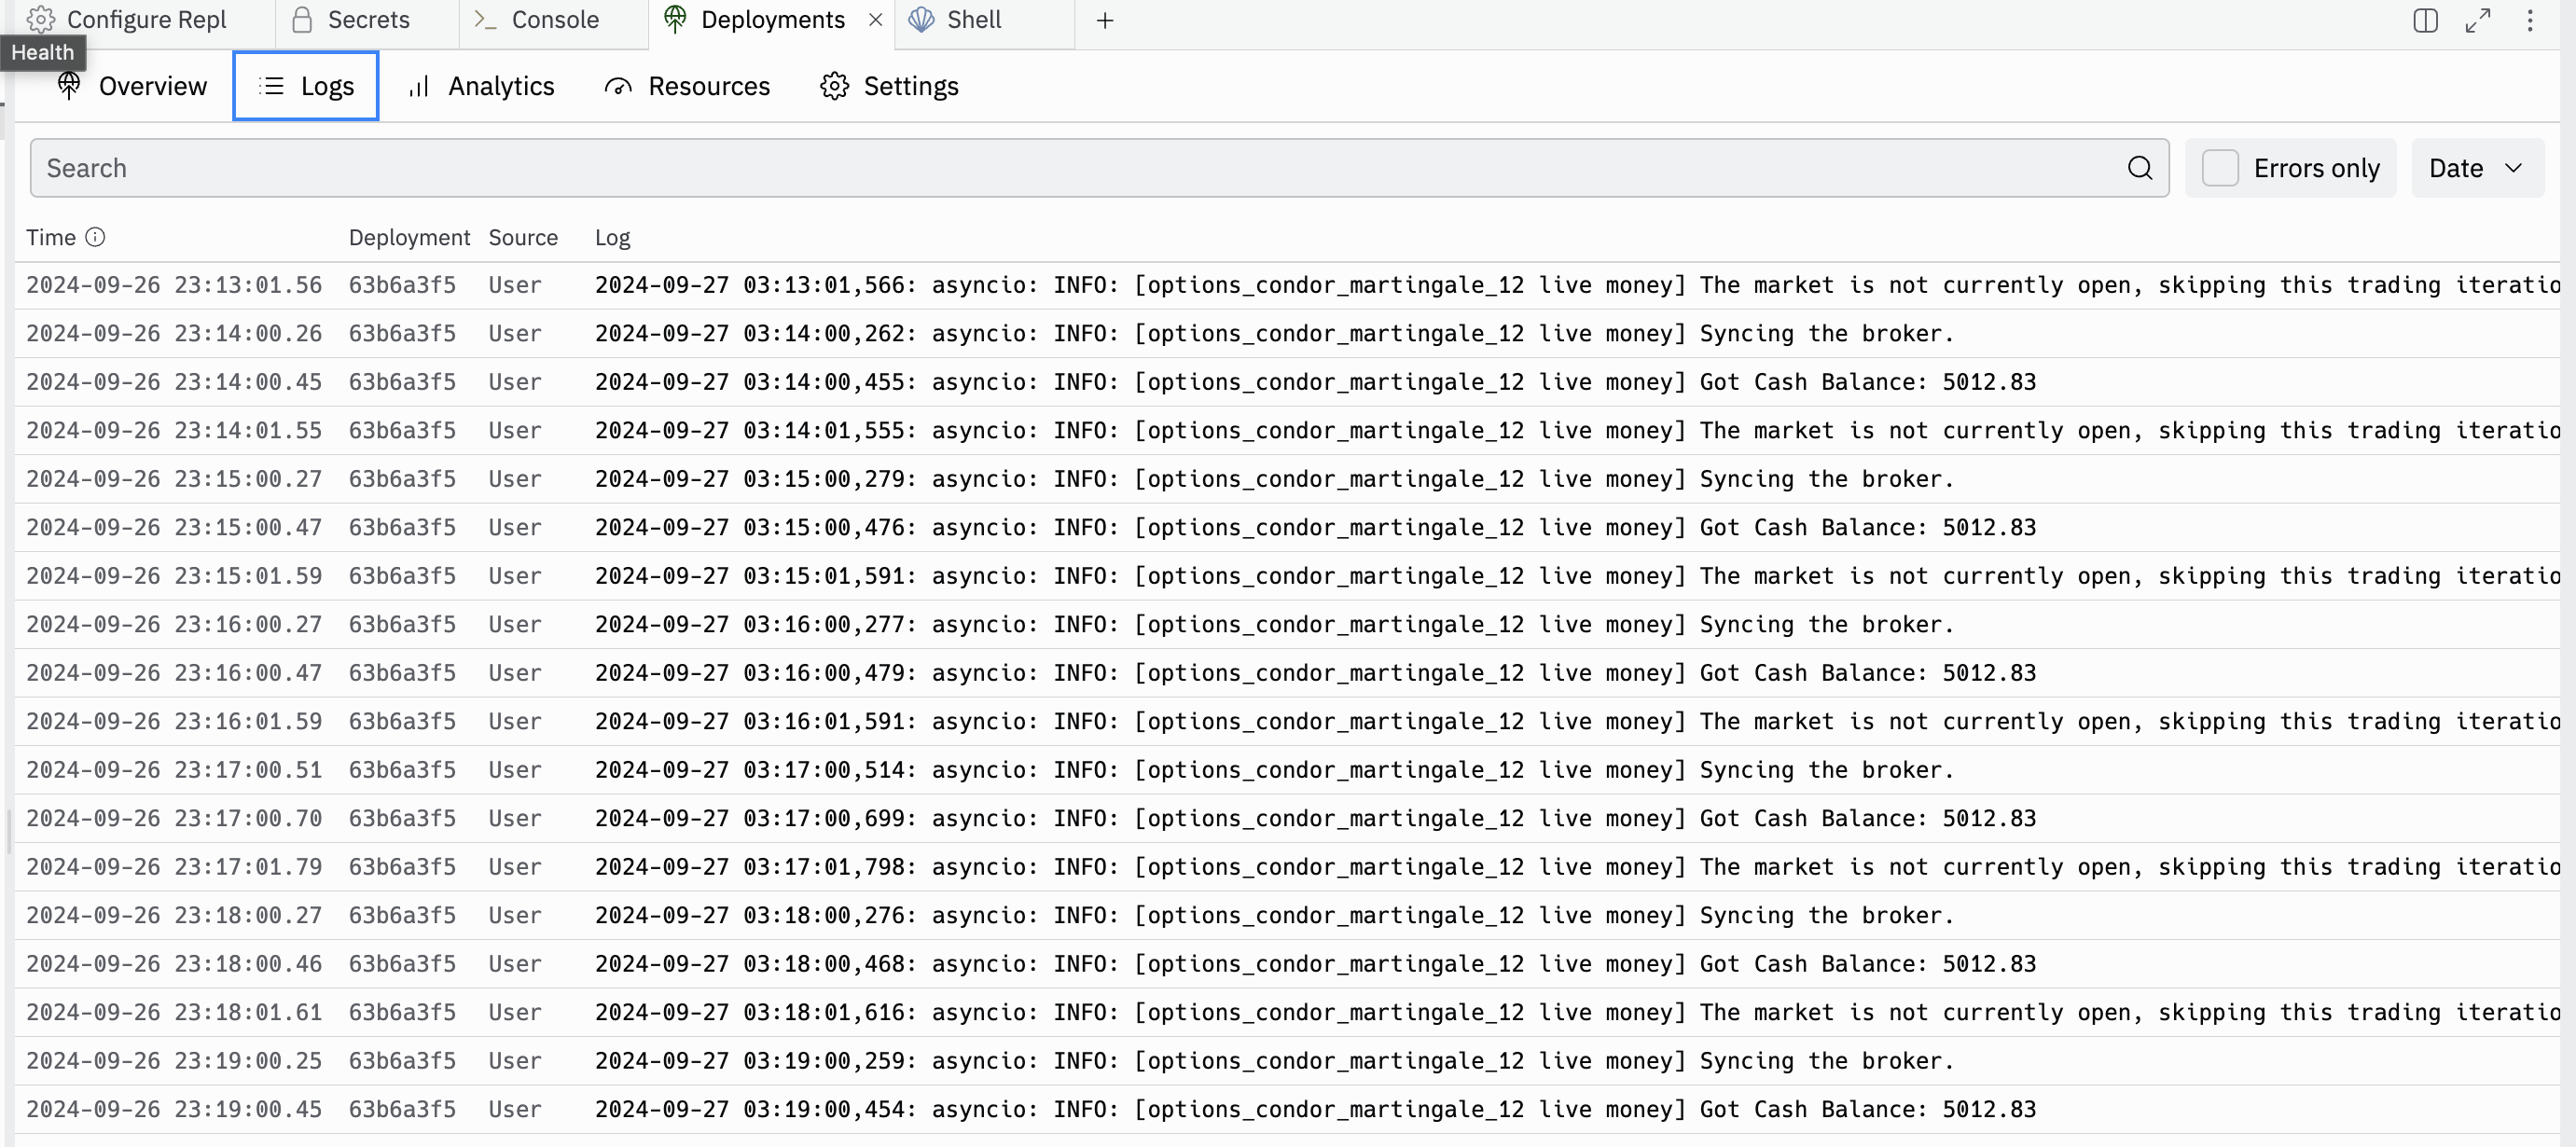
Figure 16: Viewing Logs on Replit.
Monitor Bot Performance
Monitor Performance: Go to your broker account to monitor the bot’s performance and ensure that it is executing trades as expected.
Figure 17: Monitoring bot performance.
Note
Note: Monitor the bot’s performance regularly to ensure that it is functioning correctly and making profitable trades.
Secrets Configuration
Proper configuration of environment variables is crucial for the successful deployment of your application. The most important secrets are those related to your chosen broker. First, set up the secrets for your broker, then add any additional general secrets if needed.
Tip
Tip: First, add the secrets for the broker you are using. After configuring the broker-specific secrets, you can add general secrets such as Discord webhook URLs or database connection strings.
Important
The secrets required for your chosen broker are mandatory, you only need to pick one. Also, depending on the strategy you are running, you might also need to set the `LIVE_CONFIG` environment variable.
Broker Configuration
To support different brokers, we have separate sections. Choose the one that corresponds to the broker you are using.
Tradier Configuration
Tradier is great because they can trade stocks, options, and soon futures. Tradier also offers an incredible plan for $10/month, providing commission-free options trading. This can save a lot of money for those day trading options or engaging in similar activities. To create an account, visit the Tradier website.
Secret |
Description |
Example |
|---|---|---|
TRADIER_ACCESS_TOKEN |
Your Access Token from Tradier |
qTRz3zUrl9244AHUw4AoyAPgvYra |
TRADIER_ACCOUNT_NUMBER |
Your Account Number from Tradier |
VA12204793 |
TRADIER_IS_PAPER |
Set to “True” to use the paper trading API, set to “False” to use the real money trading API. Defaults to True. |
True |
Tradovate Configuration
Tradovate is a futures broker that provides access to CME Group markets. Important: Tradovate does not provide market data, so you must configure a separate data source (such as DataBento or ProjectX). To create an account, visit the Tradovate website.
Secret |
Description |
Example |
|---|---|---|
TRADOVATE_USERNAME |
Your Tradovate username |
your_username |
TRADOVATE_DEDICATED_PASSWORD |
Your dedicated API password (not your login password) |
your_api_password |
TRADOVATE_CID |
Your Client ID from Tradovate API dashboard |
6889 |
TRADOVATE_SECRET |
Your Secret from Tradovate API dashboard |
x4078409-db42-4d6a-8469-a468a8b94ok8 |
TRADOVATE_IS_PAPER |
Set to “True” for demo trading, set to “False” for live trading. Defaults to True. |
True |
TRADOVATE_APP_ID |
Application identifier (optional, defaults to “Lumibot”) |
Lumibot |
TRADOVATE_APP_VERSION |
Application version (optional, defaults to “1.0”) |
1.0 |
Note
Since Tradovate doesn’t provide market data, you must also configure a separate data source. Set TRADING_BROKER=tradovate and DATA_SOURCE to one of: databento, projectx, ibrest (Interactive Brokers REST), or ib (Interactive Brokers Legacy).
Alpaca Configuration
Alpaca is great because they’re a commission-free broker specifically designed for API trading, which aligns perfectly with our platform. Alpaca supports trading stocks, crypto, and soon options, with their APIs working seamlessly for automated trading strategies. To create an account, visit the Alpaca website.
Secret |
Description |
Example |
|---|---|---|
ALPACA_API_KEY |
Your API key from your Alpaca brokerage account |
PK7T6YVAX6PMH1EM20YN |
ALPACA_API_SECRET |
Your secret key from your Alpaca brokerage account |
9WgJLS3wIXq54FCpHwwZjCp8JCfJfKuwSrYskKMA |
ALPACA_IS_PAPER |
Set to “True” to use the Alpaca paper trading API, set to “False” to use the Alpaca real money trading API. Defaults to True. |
True |
Coinbase Configuration
Coinbase is a cryptocurrency broker that is easy to set up and operates across all United States, including New York, which is typically challenging to find for crypto brokers. It offers a wide range of cryptocurrencies with user-friendly APIs. To create an account, visit the Coinbase website.
Secret |
Description |
Example |
|---|---|---|
COINBASE_API_KEY_NAME |
Your API key name/identifier for Coinbase. Required if you are using Coinbase as your broker. |
organizations/a7df3e75-5gg5-4b0d-805c-e91c02fd63b8/apiKeys/1abb999e-8442-4607-lkc7-423eb8d478e3 |
COINBASE_PRIVATE_KEY |
Your private key for Coinbase. Required if you are using Coinbase as your broker. |
—–BEGIN EC PRIVATE KEY—–nPLjCAQEEIFOxfolkj7JmTkEUyctOqAq0hQt02SRBy7GnJHGQyb56jToAoGCCqGSM49nAwEHoUQDQgAEg1VBKEVkqhy+9eHxeao7b7cMsbXXeB/Ggm2sYKEm2Ebrhq67Nobjn5ze8ddf78UFICjOcooHovd+1oFcZZ+RLQ==n—–END EC PRIVATE KEY—–n” |
COINBASE_API_PASSPHRASE |
Your API passphrase for Coinbase. Optional if you are using Coinbase as your broker. |
123456 |
COINBASE_IS_SANDBOX |
Set to “True” to use the Coinbase sandbox (paper trading) API, set to “False” to use the Coinbase real money trading API. Defaults to False. |
False |
Kraken Configuration
Kraken is an excellent cryptocurrency broker offering very low fees and a wide range of cryptocurrencies, likely more than Coinbase. It is ideal for users focused on crypto trading with competitive pricing. To create an account, visit the Kraken website.
Secret |
Description |
Example |
|---|---|---|
KRAKEN_API_KEY |
Your API key from Kraken. Required if you are using Kraken as your broker. |
XyZ1234567890abcdef |
KRAKEN_API_SECRET |
Your API secret for Kraken. Required if you are using Kraken as your broker. |
abcdef1234567890abcdef1234567890abcdef1234 |
Additional CCXT Exchange Examples
Lumibot implements selected CCXT exchange paths. This does not mean Lumibot supports every exchange in CCXT.
Coinbase, Kraken, and WEEX are the CCXT credential paths that Lumibot can auto-detect from environment variables. KuCoin, Binance, and BitMEX are included here as manual CCXT config examples because they have selected Lumibot/CCXT handling or examples. Bybit and OKX are included for CCXT backtesting/custom-config reference. Before using any CCXT exchange for live trading, verify account state, positions, order submission, fills, and cancellation behavior with a very small test.
KuCoin Configuration
KuCoin is a global cryptocurrency exchange offering a wide variety of cryptocurrencies and trading pairs. Lumibot’s shared CCXT broker has exchange-specific order handling for KuCoin when you pass an explicit Ccxt config. To create an account, visit the KuCoin website.
Secret |
Description |
Example |
|---|---|---|
KUCOIN_API_KEY |
Your KuCoin API key. |
5f6a7b8c9d0e1f2a3b4c |
KUCOIN_SECRET |
Your KuCoin secret. |
abcdef1234567890abcdef1234567890abcdef12 |
KUCOIN_PASSPHRASE |
Your KuCoin passphrase. |
mypassphrase456 |
Binance Configuration
Binance is a large cryptocurrency exchange by trading volume, offering extensive cryptocurrency trading options. Lumibot’s shared CCXT broker has exchange-specific order handling for Binance when you pass an explicit Ccxt config. To create an account, visit the Binance website.
Secret |
Description |
Example |
|---|---|---|
BINANCE_API_KEY |
Your Binance API key. |
9a8b7c6d5e4f3g2h1i0j |
BINANCE_SECRET |
Your Binance secret key. |
abcdef1234567890abcdef1234567890abcdef12 |
BitMEX Configuration
BitMEX is a cryptocurrency derivatives exchange specializing in futures and perpetual contracts. Lumibot documents BitMEX as a selected CCXT path/example, but live derivatives behavior requires careful validation before real trading. To create an account, visit the BitMEX website.
Secret |
Description |
Example |
|---|---|---|
BITMEX_API_KEY |
Your BitMEX API key. |
1a2b3c4d5e6f7g8h9i0j |
BITMEX_SECRET |
Your BitMEX secret. |
abcdef1234567890abcdef1234567890abcdef12 |
Bybit Configuration
Bybit is a derivatives exchange offering futures and perpetual contracts for cryptocurrency trading. Lumibot documents Bybit for CCXT backtesting/custom-config reference; do not assume the live path is production-ready without validation. To create an account, visit the Bybit website.
Secret |
Description |
Example |
|---|---|---|
BYBIT_API_KEY |
Your Bybit API key. |
2b3c4d5e6f7g8h9i0j1k |
BYBIT_SECRET |
Your Bybit secret. |
abcdef1234567890abcdef1234567890abcdef12 |
OKX Configuration
OKX is a global cryptocurrency exchange offering spot, futures, and options trading. Lumibot documents OKX for CCXT backtesting/custom-config reference; do not assume the live path is production-ready without validation. To create an account, visit the OKX website.
Secret |
Description |
Example |
|---|---|---|
OKX_API_KEY |
Your OKX API key. |
3c4d5e6f7g8h9i0j1k2l |
OKX_SECRET |
Your OKX secret key. |
abcdef1234567890abcdef1234567890abcdef12 |
OKX_PASSPHRASE |
Your OKX passphrase. |
mypassphrase789 |
WEEX Configuration
WEEX is an auto-detected CCXT credential path in Lumibot. WEEX does not provide a public API sandbox, and its terms exclude residents of some jurisdictions. Start with very small quantities until you have verified behavior.
Secret |
Description |
Example |
|---|---|---|
WEEX_API_KEY |
Your WEEX API key. Required if you are using WEEX as your broker. |
5f6a7b8c9d0e1f2a3b4c |
WEEX_API_SECRET |
Your WEEX API secret. Required if you are using WEEX as your broker. |
abcdef1234567890abcdef1234567890abcdef12 |
WEEX_API_PASSPHRASE |
Your WEEX API passphrase. Required if you are using WEEX as your broker. |
mypassphrase456 |
CCXT Backtesting Examples
Lumibot also documents CCXT backtesting examples for Kraken, Binance, KuCoin, BitMEX, Bybit, and OKX. These are selected documented exchange paths, not a claim that every CCXT exchange works out of the box.
Interactive Brokers Configuration
Interactive Brokers is ideal for international users as they offer a wide array of asset classes, including stocks, options, futures, forex, CFDs, and more. Their global presence makes them suitable for users around the world. To create an account, visit the Interactive Brokers website.
Secret |
Description |
Example |
|---|---|---|
IB_USERNAME |
Your Interactive Brokers username. |
user123 |
IB_PASSWORD |
Your Interactive Brokers password. |
password123 |
ACCOUNT_ID |
(Optional) An Interactive Brokers subaccount to trade on. |
U17369206 |
IB_API_URL |
(Optional) The URL of your self-hosted Interactive Brokers REST API. You likely don’t need it. |
Interactive Brokers-Legacy Configuration
This is the legacy version of our Interactive Brokers implementation, which uses their TWS API. It is maintained for compatibility purposes, but we recommend using the newer implementation.
Secret |
Description |
Example |
|---|---|---|
INTERACTIVE_BROKERS_PORT |
Socket port for Interactive Brokers. |
7497 |
INTERACTIVE_BROKERS_CLIENT_ID |
Client ID for Interactive Brokers. |
123456 |
INTERACTIVE_BROKERS_IP |
IP address for Interactive Brokers (defaults to “127.0.0.1”). Required if you are using Interactive Brokers as your broker. |
127.0.0.1 |
IB_SUBACCOUNT |
Subaccount for Interactive Brokers. Required if you are using Interactive Brokers as your broker. |
Subaccount1 |
Schwab Configuration
Charles Schwab provides API access for automated trading and market data through its developer platform. To create an account, visit the Charles Schwab website and follow the instructions to register for a developer account at developer.schwab.com.
Secret |
Description |
Example |
|---|---|---|
SCHWAB_API_KEY |
Your Schwab API key obtained from the developer dashboard. |
your_api_key_here |
SCHWAB_SECRET |
Your Schwab API secret obtained from the developer dashboard. |
your_api_secret_here |
SCHWAB_ACCOUNT_NUMBER |
Your Schwab account number used for trading. |
123456789 |
Bitunix Configuration
Bitunix is a cryptocurrency derivatives exchange that supports perpetual futures trading. To create an account, visit the Bitunix website.
Secret |
Description |
Example |
|---|---|---|
BITUNIX_API_KEY |
Your Bitunix API key. Required if you are using Bitunix as your broker. |
your_api_key_here |
BITUNIX_API_SECRET |
Your Bitunix API secret. Required if you are using Bitunix as your broker. |
your_api_secret_here |
DataBento Configuration
DataBento provides high-quality market data for stocks, futures, and options. This is primarily used as a data source for backtesting and live trading with futures. To create an account, visit the DataBento website.
Secret |
Description |
Example |
|---|---|---|
DATABENTO_API_KEY |
Your API key from DataBento. Required if you are using DataBento as your data source. |
db-xxxxxxxxxxxxxxxxxxxxxxxx |
ProjectX Configuration
ProjectX is a futures-only broker path currently documented for TopstepX. The adapter contains some firm-specific ProjectX prefixes for testing and future expansion, but new firms should be validated before production use.
TopstepX
Secret |
Description |
Example |
|---|---|---|
PROJECTX_TOPSTEPX_API_KEY |
Your API key from TopstepX |
your_api_key |
PROJECTX_TOPSTEPX_USERNAME |
Your TopstepX username |
your_username |
PROJECTX_TOPSTEPX_PREFERRED_ACCOUNT_NAME |
(Optional) Preferred account name |
Practice Account 1 |
Top One Futures
Secret |
Description |
Example |
|---|---|---|
PROJECTX_TOPONE_API_KEY |
Your API key from Top One Futures |
your_api_key |
PROJECTX_TOPONE_USERNAME |
Your Top One Futures username |
your_username |
PROJECTX_TOPONE_PREFERRED_ACCOUNT_NAME |
(Optional) Preferred account name |
Practice Account 1 |
TickTickTrader
Secret |
Description |
Example |
|---|---|---|
PROJECTX_TICKTICKTRADER_API_KEY |
Your API key from TickTickTrader |
your_api_key |
PROJECTX_TICKTICKTRADER_USERNAME |
Your TickTickTrader username |
your_username |
PROJECTX_TICKTICKTRADER_PREFERRED_ACCOUNT_NAME |
(Optional) Preferred account name |
Practice Account 1 |
AlphaTicks
Secret |
Description |
Example |
|---|---|---|
PROJECTX_ALPHATICKS_API_KEY |
Your API key from AlphaTicks |
your_api_key |
PROJECTX_ALPHATICKS_USERNAME |
Your AlphaTicks username |
your_username |
PROJECTX_ALPHATICKS_PREFERRED_ACCOUNT_NAME |
(Optional) Preferred account name |
Practice Account 1 |
Aqua Futures
Secret |
Description |
Example |
|---|---|---|
PROJECTX_AQUAFUTURES_API_KEY |
Your API key from Aqua Futures |
your_api_key |
PROJECTX_AQUAFUTURES_USERNAME |
Your Aqua Futures username |
your_username |
PROJECTX_AQUAFUTURES_PREFERRED_ACCOUNT_NAME |
(Optional) Preferred account name |
Practice Account 1 |
Blue Guardian Futures
Secret |
Description |
Example |
|---|---|---|
PROJECTX_BLUEGUARDIANFUTURES_API_KEY |
Your API key from Blue Guardian Futures |
your_api_key |
PROJECTX_BLUEGUARDIANFUTURES_USERNAME |
Your Blue Guardian Futures username |
your_username |
PROJECTX_BLUEGUARDIANFUTURES_PREFERRED_ACCOUNT_NAME |
(Optional) Preferred account name |
Practice Account 1 |
Blusky
Secret |
Description |
Example |
|---|---|---|
PROJECTX_BLUSKY_API_KEY |
Your API key from Blusky |
your_api_key |
PROJECTX_BLUSKY_USERNAME |
Your Blusky username |
your_username |
PROJECTX_BLUSKY_PREFERRED_ACCOUNT_NAME |
(Optional) Preferred account name |
Practice Account 1 |
Bulenox
Secret |
Description |
Example |
|---|---|---|
PROJECTX_BULENOX_API_KEY |
Your API key from Bulenox |
your_api_key |
PROJECTX_BULENOX_USERNAME |
Your Bulenox username |
your_username |
PROJECTX_BULENOX_PREFERRED_ACCOUNT_NAME |
(Optional) Preferred account name |
Practice Account 1 |
E8 Futures
Secret |
Description |
Example |
|---|---|---|
PROJECTX_E8X_API_KEY |
Your API key from E8 Futures |
your_api_key |
PROJECTX_E8X_USERNAME |
Your E8 Futures username |
your_username |
PROJECTX_E8X_PREFERRED_ACCOUNT_NAME |
(Optional) Preferred account name |
Practice Account 1 |
Funding Futures
Secret |
Description |
Example |
|---|---|---|
PROJECTX_FUNDINGFUTURES_API_KEY |
Your API key from Funding Futures |
your_api_key |
PROJECTX_FUNDINGFUTURES_USERNAME |
Your Funding Futures username |
your_username |
PROJECTX_FUNDINGFUTURES_PREFERRED_ACCOUNT_NAME |
(Optional) Preferred account name |
Practice Account 1 |
The Futures Desk
Secret |
Description |
Example |
|---|---|---|
PROJECTX_THEFUTURESDESK_API_KEY |
Your API key from The Futures Desk |
your_api_key |
PROJECTX_THEFUTURESDESK_USERNAME |
Your Futures Desk username |
your_username |
PROJECTX_THEFUTURESDESK_PREFERRED_ACCOUNT_NAME |
(Optional) Preferred account name |
Practice Account 1 |
Futures Elite
Secret |
Description |
Example |
|---|---|---|
PROJECTX_FUTURESELITE_API_KEY |
Your API key from Futures Elite |
your_api_key |
PROJECTX_FUTURESELITE_USERNAME |
Your Futures Elite username |
your_username |
PROJECTX_FUTURESELITE_PREFERRED_ACCOUNT_NAME |
(Optional) Preferred account name |
Practice Account 1 |
FXIFY Futures
Secret |
Description |
Example |
|---|---|---|
PROJECTX_FXIFYFUTURES_API_KEY |
Your API key from FXIFY Futures |
your_api_key |
PROJECTX_FXIFYFUTURES_USERNAME |
Your FXIFY Futures username |
your_username |
PROJECTX_FXIFYFUTURES_PREFERRED_ACCOUNT_NAME |
(Optional) Preferred account name |
Practice Account 1 |
Goat Funded Futures
Secret |
Description |
Example |
|---|---|---|
PROJECTX_GOATFUNDEDFUTURES_API_KEY |
Your API key from Goat Funded Futures |
your_api_key |
PROJECTX_GOATFUNDEDFUTURES_USERNAME |
Your Goat Funded Futures username |
your_username |
PROJECTX_GOATFUNDEDFUTURES_PREFERRED_ACCOUNT_NAME |
(Optional) Preferred account name |
Practice Account 1 |
Hola Prime
Secret |
Description |
Example |
|---|---|---|
PROJECTX_HOLAPRIME_API_KEY |
Your API key from Hola Prime |
your_api_key |
PROJECTX_HOLAPRIME_USERNAME |
Your Hola Prime username |
your_username |
PROJECTX_HOLAPRIME_PREFERRED_ACCOUNT_NAME |
(Optional) Preferred account name |
Practice Account 1 |
Nexgen Futures
Secret |
Description |
Example |
|---|---|---|
PROJECTX_NEXGEN_API_KEY |
Your API key from Nexgen Futures |
your_api_key |
PROJECTX_NEXGEN_USERNAME |
Your Nexgen Futures username |
your_username |
PROJECTX_NEXGEN_PREFERRED_ACCOUNT_NAME |
(Optional) Preferred account name |
Practice Account 1 |
TX3 Funding
Secret |
Description |
Example |
|---|---|---|
PROJECTX_TX3FUNDING_API_KEY |
Your API key from TX3 Funding |
your_api_key |
PROJECTX_TX3FUNDING_USERNAME |
Your TX3 Funding username |
your_username |
PROJECTX_TX3FUNDING_PREFERRED_ACCOUNT_NAME |
(Optional) Preferred account name |
Practice Account 1 |
DayTraders
Secret |
Description |
Example |
|---|---|---|
PROJECTX_DAYTRADERS_API_KEY |
Your API key from DayTraders |
your_api_key |
PROJECTX_DAYTRADERS_USERNAME |
Your DayTraders username |
your_username |
PROJECTX_DAYTRADERS_PREFERRED_ACCOUNT_NAME |
(Optional) Preferred account name |
Practice Account 1 |
Demo/Testing
Secret |
Description |
Example |
|---|---|---|
PROJECTX_DEMO_API_KEY |
Your API key for demo/testing |
your_api_key |
PROJECTX_DEMO_USERNAME |
Your demo username |
your_username |
PROJECTX_DEMO_PREFERRED_ACCOUNT_NAME |
(Optional) Preferred account name |
Practice Account 1 |
General Environment Variables
In addition to broker-specific secrets, the following environment variables are required for the strategy to function correctly:
Secret |
Description |
Example |
|---|---|---|
LUMIWEALTH_API_KEY |
Your API key from the BotSpot.trade website so that you can track your bot’s performance. To get this API key, visit the BotSpot.trade website and add/create a bot. After creating the bot, you will receive an API key. |
694rr2c8d9234b43a40fab494a79f5634ghd4f39d44ccf2e |
LIVE_CONFIG |
Your live config file, only needed for strategies that have multiple configurations (there will be a folder named “configurations” in the src/ folder) and if you are running the strategy live. |
paper_1 |
IS_BACKTESTING |
(Optional) Set to “True” to run the strategy in backtesting mode, set to “False” to run the strategy live (defaults to False). |
False |
BACKTESTING_START |
(Optional) The start date for backtesting in the format “YYYY-MM-DD”. Only needed if you are backtesting. |
2025-01-01 |
BACKTESTING_END |
(Optional) The end date for backtesting in the format “YYYY-MM-DD”. Only needed if you are backtesting. |
2025-01-31 |
POLYGON_API_KEY |
(Optional) Your API key from your Polygon account, only needed if you are backtesting. |
a7py0zIdhxde6QkX8OjjKNp7cD87hwKU |
DISCORD_WEBHOOK_URL |
(Optional) Your Discord webhook URL, only needed if you want to send notifications to Discord. Learn how to get a Discord webhook URL here: Discord Webhooks |
|
DB_CONNECTION_STR |
(Optional) Your connection string to your account history database, only needed if you want to save your account history to a database. |
sqlite:///account_history.db |
STRATEGY_NAME |
(Optional) The name of the strategy. This will change the strategy_id in the database and in the Discord messages. |
My Strategy |
MARKET |
(Optional) The market you want the bot to think it is. Eg. “24/7” will make the bot think it is trading in a 24/7 market. |
NYSE |
POLYGON_MAX_MEMORY_BYTES |
(Optional) The maximum memory in bytes that the Polygon API can use. This is useful for limiting memory usage during backtesting. |
512000000 |
TRADING_BROKER |
(Optional) For live trading, specify the broker to use for executing trades. If not set, the default broker configuration will be used for both trading and data. Valid options (case insensitive): “alpaca”, “tradier”, “ccxt”, “coinbase”, “kraken”, “weex”, “ib” (or “interactivebrokers”), “ibrest” (or “interactivebrokersrest”), “tradovate”, “schwab”, “bitunix”, “projectx” |
tradier |
DATA_SOURCE |
(Optional) For live trading, specify a separate data source for market data. If not set, the same broker as trading will be used for data. This allows you to use one broker for trading and a different data provider for market data. Valid options (case insensitive): “alpaca”, “tradier”, “ccxt”, “coinbase”, “kraken”, “weex”, “ib” (or “interactivebrokers”), “ibrest” (or “interactivebrokersrest”), “yahoo”, “schwab”, “databento”, “bitunix”, “projectx” |
databento |
DATA_SOURCE_DELAY |
(Optional) Sets a delay parameter to control how many minutes to delay non-crypto data for. For example, the AlpacaData source uses a 16 minute delay by default. Override this to 0 if you have the paid SIP plan with not delayed data. |
0 |
Tip
Tip: If you are running the strategy on your own computer, create a .env file in the same directory as main.py and add the environment variables there instead of using Replit or Render secrets.
Final Steps
After configuring all the necessary environment variables and deploying your application on your chosen platform, ensure that everything is running smoothly:
Verify Deployment: Check the deployment logs to ensure there are no errors.
Test Functionality: Perform a few tests to confirm that the application behaves as expected.
Monitor Performance: Use the monitoring tools provided by Render or Replit to keep an eye on your application’s performance.
Conclusion
Deploying your application is straightforward with our GitHub deployment buttons for Render and Replit. By following this guide, you can quickly set up your environment variables and get your application live. Happy deploying! 🎉
For further assistance, refer to the Render Documentation or the Replit Documentation.